 Windows DVD Maker introduces an easy and simple steps in creating a professional-looking video DVDs and pictures that can be opened on your standard DVD players, regardless of your geographical region codes. It serves as a companion program to Windows Movie Maker and available in Windows Vista Home Premium and Windows Vista Ultimate edition.
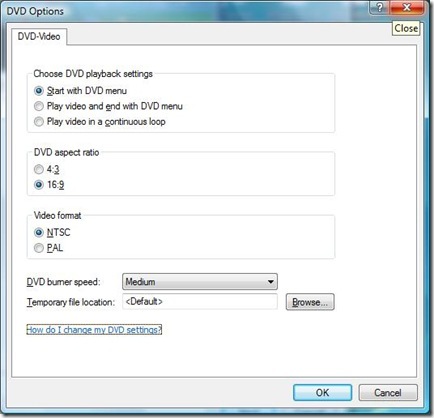
Important settings that you must check before creating a Dvd movie:
1. Hardisk space, you should have a free space for temporary files that are created when making a DVD. (At least 5gb)
2. Video format: NTSC or PAL, check this options after adding the files into the Windows DVD Maker.
3. DVD aspect ratio: 4:3 (standard) or 16:9 (widescreen), if you did not set this option, video files in a widescreen format will be stretch if the standard setting is used (4:3) and vice-versa.
How to burn and change Windows DVD Maker Options/Settings:
- Open Windows DVD Maker->Choose Pictures and Videos. On the Main window (Add pictures and video to the DVD window), change the title of the disc.
- Put videos and pictures using "Add items" button. You can arrange them afterwards by clicking Move up and Move down button.
- Click Options, don't forget to check and change the settings.
4. Click Ok.
After that choose the menu style that you want. If you like to customize it, edit text, add some videos (foreground and background) and audio, go to "Menu Text" and "Customize Menu".
If not, just click the burn button.
I have encountered these problems while using Windows DVD Maker because I did not check the above settings. So, I would like to share this to all of you.
Enjoy!
Other Topics:
CPU-Z, a useful System Profiler tool
Quicktip: How to prolong your Laptop Battery
CDBurnerXP, burns Blu-Ray and HD-DVDs for FREE
Windows Xp, Web, Software Reviews and Hacks

0 Comments:
Post a Comment