Unlock For Us

[Vista/XP] Worm Busted Part 2! How to Detect, Clean/Remove Manually inside the USB Flash Drive

Page 1 2 3

AUTOPLAY Unlock For Us

Last time, I wrote a two pages detailed guide on how to fix/detect the problem in "Application not a Found" Error Message when a USB stick or CD/DVD is inserted and we found out that the possible reasons is a damaged CD or an Infected one.

Now, What if there is no message at all? How can we know if there's a virus exists?

Here: Worm / Virus Busted Part 2!

..................................................................................

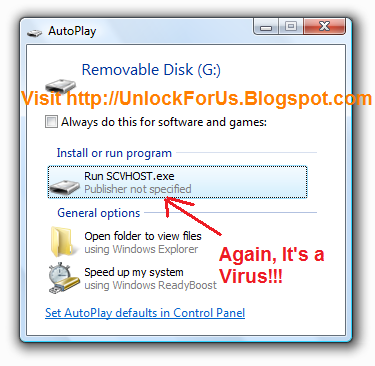
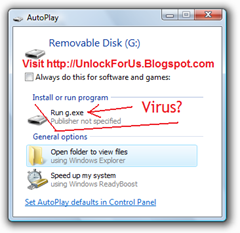
When you insert a usb flash disk, your Anti-Virus software will not automatically know or detect that it has a virus unless you've clicked the file in windows explorer. In Windows Vista, UAC will prevent the execution of the program from running and start exploiting the Autoplay feature by asking a confirmation message.

So as a regular user, how can we know or prevent that?


1. DO NOT RUN ANY PROGRAM WHEN YOU INSERT THE USB DISK.

I'm sure your familiar in all files saved inside your USB data disk. If you know that there is no software installed to automatically run when you insert the USB then, CLICK THE CLOSE BUTTON in AutoPlay Window.


2. UNHIDE/SHOW ALL HIDDEN FILES AND FOLDERS IN WINDOWS EXPLORER

When you've noticed that there is a program that wants to open after inserting the USB flash disk, as shown in the picture above.

How? Open Windows Explorer, Press Alt-T > View Tab > Choose the option "Show hidden files and Folders"


3. Open the drive and start searching for hidden files.

Gotcha2  

Gotcha! It's another kind of worm exploiting AUTORUN.INF

g.exe, vmhr.bat, wvcst.vbs

>> READ MORE: Go to Second Page


Read more...
The Best Protection Against Worms in Windows Vista

Continuation: Page 1 2 3

These things happened several weeks ago and It's really creepy. There are many variants and kinds of worms now. No wonder why Microsoft enabled UAC by default in Windows Vista.

For Better protection:

1. Turn ON UAC (User Account Control) In Windows Vista

Using WinBubbles: Security Tab > Prompt for Consent (Default/Recommended) > Click the Apply Button or simply press "ALT-A"

2. Turn OFF/Disable Autoplay in Windows Vista/XP

Download and Open WinBubbles > Go to Security Tab > Disable AutoPlay in all types of media > Simply press "ALT-A" or click the Apply Button

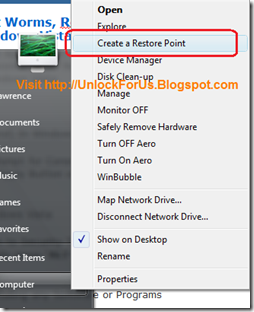
createarestorepoint


3. Create a Restore Point Before Installing any Software or Programs

This will let you recover system files that has been modified and restore your Computer after installation of Incompatible Drivers:

- Put a "Create a Restore Point" Context Menu


4. Learn How to Check and Restore your Windows System Files

- How to use SFC.EXE Tool in Windows Vista

5. Please read my first article about Worms:

Opening CD/USB Drive "Application not found" [Vista-XP Security: Virus/Worm Busted!]

6. Always Update your copy of Windows Vista by installing Service Pack 1 and other Windows Security Updates


For Best Protection:

Follow and learn the recommended steps above, and Install the Best Free Anti-virus Programs like AVG and AVAST


>> Last Page


Read more...

What?! It's Another Worm: SVHOST.EXE and NEW FOLDER.EXE

Continuation: Page 1 2 3opening

No Doubt, Windows Vista UAC Nails any Rootkits and Worms.

 findout

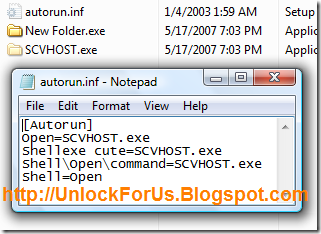
Autorun.inf, SVHOST.exe and New Folder.exe: Partners in Crime

[Autorun]
Open=SCVHOST.exe
....

In any hybrid systems like Microsoft Windows, we must choose and see things in the long run.

Turning ON the Annoying UAC and Learn from it or get Unknown Virus in the future that can't be detected by Any Anti-Virus or Anti-Spyware Software?

You Choose...


Read more:

Opening CD/USB Drive "Application not found" [Vista-XP Security: Virus/Worm Busted!]

Opening CD/USB Drive "Application not found" [Vista-XP Security: Virus/Worm Busted!]-2


Read more...

Unlock For Us

[Vista] FIX: Your phone is in file transfer mode and cannot be used with PC Suite...

When you try to connect your Nokia Phone via USB in Windows Vista the Error message occurs. Also, we will notice another message in Nokia PC suite and a Tool Tip in the Notification area that says:

"Nokia Device Bus connected in non-compatible mode..."

Other Symptoms:

1. You cannot connect the phone to your laptop / PC

2. Nokia Browser through Windows Explorer is very slow

3. Connecting the phone and setting as Mass storage most of the times doesn't work.

4. Windows Explorer is always closing and restarting.

5. Lots of Error messages while using Nokia PC Suite.

errorcaused2

Main Cause:

  1. By Clicking the Option "Locate and install driver software (recommended)", you are allowing the old incompatible Device Driver to be installed (CDC Comms Interface). Therefore, next time you plug-in your Nokia phone, it will automatically connect, re-install the driver and the error message will appear.
  2. You are using the older and incompatible version of PC suite in Windows Vista

[Prevention is Better than Cure]:

Download and open WinBubble to create a Context Menu/Right-Click Item and use it to create a restore point manually before installing, using or connecting anything devices in your Windows Vista computer e.g. software installation and changing System Files.

Read this guide: Adding "Create a Restore Point" Right-Click Menu

Quick Solution:

1. Choose "Don't show this message again for this device"

Permanent Solution (Recommended)

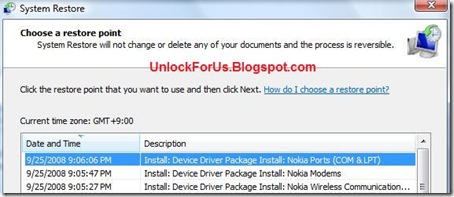
If you already clicked the first option. Open System Restore by going to Start Search > type "rstrui" or simply type System restore.

Once System Restore Tool is open Choose the Description:

"Install: Device Driver Package Install: Nokia Ports (COM & LPT)"

Note: If you can't see the Description, choose the older restore point e.g. Installation of Nokia PC Suite

systemrestore

After Restoration, please proceed with the steps below:

solution2

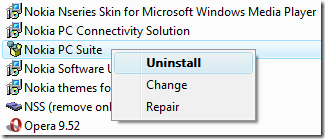
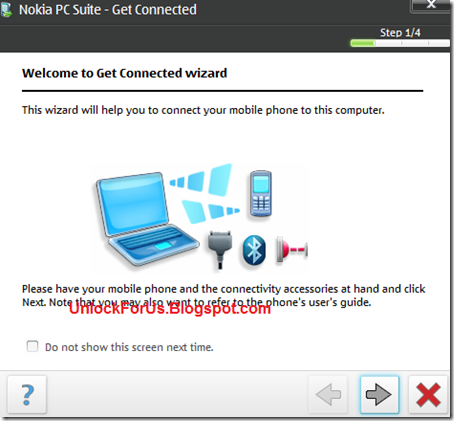
Uninstall the old version, download and install the latest software of Nokia PC Suite. The new version is Windows Vista compatible which is faster, reliable and stable build.

pcsuite7

1. It will remove all the error messages and switching the mode of connection (PC Suite, Mass Storage, Media Player and PictBridge) is fast.

2. The sluggish Nokia Browser in Windows Explorer is now stable and you will not anymore see Windows Explorer crashing.

3. Automatic Connection and detection of the phone.

Nokia Phone Models that has been reported to have this problem in Windows Vista:

"Your phone is in file transfer mode and can not be used with PC suite. Quit file transfer mode from the phone if you want to use the phone with PC Suite."

Nokia 6680

Nokia N70, N73

Nokia 3250

Nokia 3230

Nokia 6555

If your phone is not listed above and these steps solved your problem... Please write a comment below.

Thanks in Advance.

Other Fixes:

[Help] How to Fix, Repair and Restore (Recover) Windows Vista Easily

How to Restore Windows Vista Icons

[Vista] How to Restore Folder Icons to Default

"Access denied" Moving, Editing, Opening and Deleting a File or Folder in Windows Vista/XP

[Vista] Hibernate Button is gone


For more Tips:
Unlock for Us: Windows Vista Unlocks, News, Tips and Tweaks


Read more...

Unlock For Us

[Vista] Icon Changer (It's FREE!)

There are many ways to change and customize your icons in Windows Vista: changing some of them manually in the registry, directly edit the icon libraries and changing icons using a freeware or shareware application that lets you do it easily.

Let's  Start Changing them the way that you want for Free.

Changing Desktop Icons

Change desktop icons

Right-Click > Personalize > Change Desktop Icons

Pros: No Software needed

Cons: Limited

Changing Folder Icons

Most of the us are changing folder icons to easily find or recognize and memorize the location of the files.

Right-Click to the folder > Customize Tab

Read more: Customize your Folder Icons to Enhance Windows Vista Experience

Tips and Tricks

Using WinBubble Icon Changer, Customizing Desktop Shortcuts and Removal of Shortcut Overlay Icons

desktopicons

Some of the Applications and Softwares like Internet Explorer will not let you change it's icons easily.

TIP: Just create a shortcut on desktop, Change the Icons and Remove the Shortcut Overlay Arrow Icon.

a. Create a Desktop shortcut of the application and change the icon

a.1) Go the the Application directory (e.g. \Program Files\AppName) Right-Click and Send To Desktop (Create Shortcut)

a.2) Go to the Desktop Shotcut > Right-Click > Properties > Shortcut > Change icon... Button

b.) Remove the Shortcut Overlay icons using WinBubble

b.1) Download and Open WinBubble

b.2) At the General Tab > Click the "Remove the Shortcut Arrow" Option and Press "ALT-A" or just click the Apply Button.


Customizing and Restoring Icons with WinBubble:

winbubble

WinBubble can customize some Windows Icons as shown above. Originally, the software was designed to Restore your icons in Windows Vista Not Changing the icons. But As I developed the program, some ideas came to me and Now you can easily Change your Drive icons to High-Resolution without downloading from the web.

hardisk


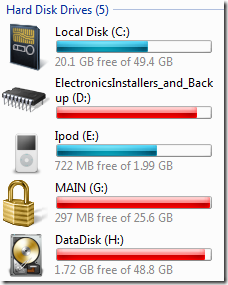
Whether your just getting started or not. It let's you explore all the hidden high-resolution icons in Windows Vista. Easily...


To put them back  to it's original settings or default just click the Restore all to default Button. That's it!


Customizing your Shortcut Overlay Arrow Icon

heart WinBubble will let you change the Big Shortcut Arrow Overlay icons in Windows Vista. There's an existing icons included in the app like Heart, Star and Windows logo. You can also download from the web or create icons by yourself and set it up using WinBubble. Enjoy!

Read more: Changing Shortcut Overlay Arrow Icons


Changing Windows Vista File-Type Icons

I remember one user asked something about removing Context Menu for a certain file type. As I explore the registry, I learned how to remove entries in Context Menu and how to change the icon for a certain file type like .txt, .zip, .rar, .doc and others.

Read here: Removing Right-Click Menu Items, Customizing and Changing File Type Icons (File Extension) in Windows Vista


Read more...

Removing Right-Click Menu Items, Customizing and Changing File Type Icons (File Extension) in Windows Vista

txt 

I scanned my notes several months ago, a user asked me on how to remove an item in Windows Context Menu. While exploring the registry, I learned also how to change the icon in certain file-types such as .txt, .doc, .zip, .ini, .xls., .avi, .3gp, .mpg and others.

Let's Begin on How did I find out.

1. Open the Registry Editor: Start Search > type "regedit" and press enter.

2. This is what I wrote in my notes:

"Once I opened the Registry Editor and expand HKEY_CLASSES_ROOT. I saw ._sln (I'm thinking...) What if .txt?"

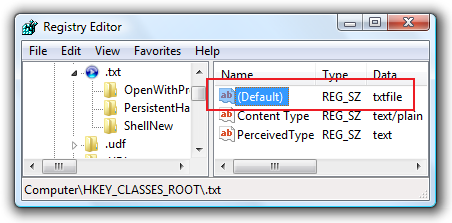
type ".txt", it will open the .txt Registry Key (Folder) and you'll notice that there's a Default value called txtfile, as shown in the picture above.

Since most of Context Menus needs a Registry Key setting like Shell\[item name]\command

I said to myself "It's not here..."

So, again I type: txtfile

Gotcha!

My point why I wrote this guide... Don't just copy the work of other people. THINK...

If you find something nice and great, even if you did not unlock it first, you'll shout YES! and I can say It's fun and exciting. You can learn many things in the registry (most of them are undocumented...)

defaulticon

.txt File Extension Icon Location

HKEY_CLASSES_ROOT\txtfile\DefaultIcon

.txt File Open and Print Context Menu Entry Location

HKEY_CLASSES_ROOT\txtfile\shell

That's it!

Note: To Backup the Original Settings > Right-Click the Key (Folder) > Export

Now, Please explore more registry Hidden settings! (It's Fun...)

Please Read the Complete Article: [Vista] Icon Changer (It's FREE!)


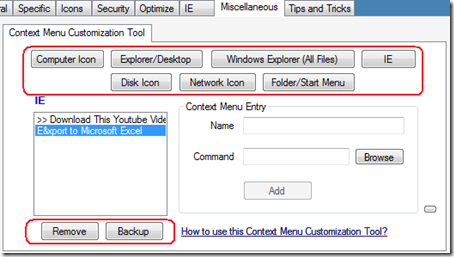
If you want to easily remove Context Menu items in Computer Icon, Folder and Start Menu Orb, desktop or Windows Explorer Right-Click Menu, Internet Explorer, hard disk and network icon: Use WinBubbles

removingrightclickmenuitems

Go to the Miscellaneous Tab and Click the Button e.g. IE > Choose which Item to be removed > To have a back up, Click the Backup Button First > Then Finally, Click the Remove Button

Enjoy!


Read more: Add your applications to Context Menu (Right-Click Menu)

[Vista/XP] Easily Remove/Clean-up Internet Explorer Context Menu Entry

Add "Hide/Show Computer" in Network Icon Context Menu


Read more...

Unlock For Us

How to Remove, Create and Add Security Policy: Disable/Enable IE7 and the New IE8 Restrictions

Adding Security Policy is very easy in Windows Vista Business and Ultimate versions. Using Gpedit.msc you can completely Customize the Security settings, enable/disable some components in Internet Explorer and others. How about Windows Vista Basic and Home Premium?

WinBubbleRestriction

In order to get the functionality of Group Policy Editor, you need to manually edit the Registry using the Documents from Microsoft or use WinBubble.

Using WinBubble:

1. Download WinBubble and go to the Security Tab

2. Choose some options and press "ALT-A" or just click the Apply Button. That's it.

Disable File Menu > New Window

Disable File Menu > Open

Disable File Menu > Save As

Remove 'Favorites' Menu, By default gone? just click to check and uncheck > Click the Apply Button > Finally, Restart IE

Useful Restrictions in Schools and Internet Cafe

Disable Right-Click Menu and Downloading Files

Disable Right-Click Menu > View Source

Disable Internet Options

Removing Tab inside the Internet Options (General, Security, Privacy, Content, Connections Tab which is famous in offices that uses Proxy, Programs and Advanced Tab)

Using Gpedit.msc (Windows Vista Business and Ultimate Versions Only)

Go to User Configuration > Administrative Templates > Windows Components > Internet Explorer

gpedit

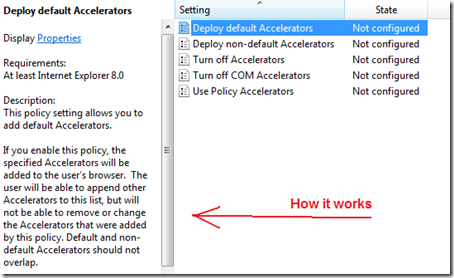
This is an advanced and complete configuration tool for Internet explorer. Even the New Features of Internet Explorer 8 is now included and available. e.g. Accelerators and Compatability View

Enabled, Disabled and Not Configured

IE8 Accelerators

Deploy default Accelerators, This policy setting allows you to SET default Accelerators. You can Add New Accelerators but you can't removed the default ones.

Deploy non-default Accelerators, same Deploying default ones...

Note: Non-Default and Default MUST NOT Overlapped.

Turn-Off Accelerators, Users will not be able to access or use Accelerators

Turn Off COM Accelerators, Users will not be able to access or use COM Accelerators.

Use Policy Accelerators, If you Add or Enable this policy, users can only access Accelerators that are deployed through Group Policy.  NOTE: Users will not be able to add or delete Accelerators.

IE 8 Compatibility View

Turn Off Compatibility View, Users will not be able to use the Compatibility View button or manage the Compatibility View sites list.

Turn Off Compatibility View Button,This policy controls the Compatibility View button which appears on the command bar

Turn On Internet Explorer 7 Standards Mode: If you enable this policy setting, Internet Explorer will be FORCE to use Internet Explorer 7 Mode and settings. This option results in the greatest compatibility with existing Web pages, but newer content written to common Internet standards may not display correctly.

Turn On Internet Explorer Standards Mode For Local Intranet

Use Policy List of Internet Explorer 7 sites, This will allow you to add specific sites that must be viewed in Internet Explorer 7 Compatibility View and users will be able to add and remove sites from the list, but they cannot remove the entries you specify.


Read More:  Unlocking WinBubble Part 3 *Securing your desktop


Read more...

Unlock For Us

How to Make/Create a Bootable USB Flash Disk Windows Vista Installer

windows[1]

Mr Dave Glover of Blogs.MSDN.com wrote a guide on how to create a USB Thumb Drive Vista Installer. The article is interesting because recently a friend of mine wishes to install Windows Vista onto a laptop in which DVD drive is not working anymore (it's already dead).

BTW, this is really useful for all DVD less laptops. So, I wrote a Complete Step-by-Step Beginner's Style Guide  on how to do it easily, Not Just For the Geeks But For All.

format2

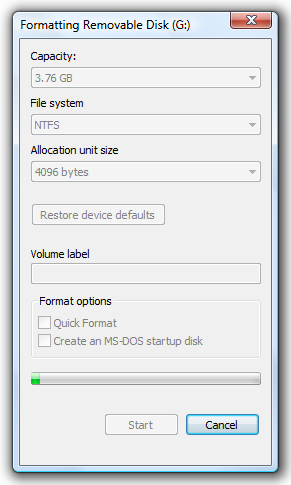
1. Format the USB Stick as  NTFS: Open Windows Explorer and Right-Click the Drive > Choose the Format Option

2. In the File System Combo box, Choose NTFS and Click the Start Button to begin.

3. Afterwards, Open the Command Prompt as Administrator: In Start Search type, cmd > Press CTRL + Shift + Enter

or you will get... "Access is denied" Message after launching diskpart command.


4. Setting the USB Partition Active (Diskpart.exe)

a. In the Command prompt, type: Diskpart and press Enter

b. Please wait for a while and type: list volume and press Enter

- The command will let you see all the drives and partitions

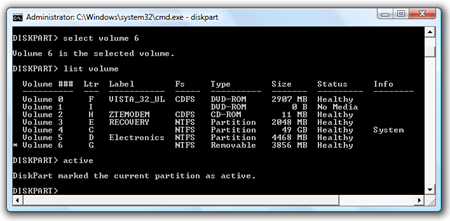
c. Find which volume for your Removable USB Drive, in my case 6, Therefore Type: select volume 6 and press Enter again

 selectandactive

d. type: active and press enter

DiskPart marked the current partition as active.

To learn more about the commands, press ? and Enter Key.

Now you already finished setting the volume active so, type the command Exit and press Enter Again

5. Create a Boot Sector (bootsect.exe)

What is Bootsect? In the Command Prompt, enter the following command to learn about the tool: bootsect /?

SYNTAX:

bootsect {/help|/nt60|/nt52} {SYS|ALL|<DriveLetter>:} [/force]

Boot sector restoration tool

Bootsect.exe updates the master boot code for hard disk partitions in order to switch between BOOTMGR and NTLDR.  You can use this tool to restore the boot sector on your computer.

Run "bootsect /help" for detailed usage instructions.

It is located at your Windows Vista installer directory called \boot

1. Let's go back to the guide...First, Find where's your DVD Drive is located (Windows Vista Installer) and go to the boot directory, which in my case Drive F:

Next, type: bootsect(space)/nt60(space)Flash Drive Letter

C:\Windows\System32>f:

F:\>cd boot

F:\BOOT>bootsect /nt60 g:
Target volumes will be updated with BOOTMGR compatible bootcode.

G: (\\?\Volume{e5e56f28-84e3-11dd-bd4b-00188bdb682d})

    Successfully updated NTFS filesystem bootcode.

Bootcode was successfully updated on all targeted volumes.

F:\BOOT>

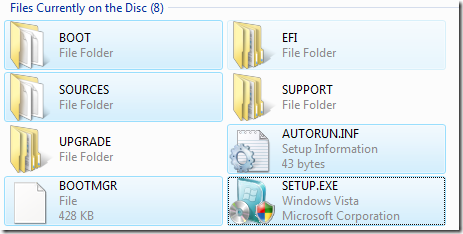
6. You have now successfully created a Boot Sector for the Vista Installer... Finally, Open Windows Explorer > Go to the the Windows Vista Installer DVD Drive and Copy these Files and folders onto the USB Stick:

copyvistadvd

1. Boot Directory

2. Sources Directory

3. Files in the root directory (drive)

That's it!

Now you have a USB Stick Bootable Vista Installer... which BTW Rocks! (As Mr David says... Anyway, Me too!!!)

It's very useful in troubleshooting and fixing Windows Vista problems e.g. Unbootable, infected by a virus, very slow and many more.

Enjoy Learning Windows Vista!!!


Read more Articles:

Useful System File Checker Tool: Scans, Checks and Restore Corruptions in Windows System Files

Useful [Help] How to Fix, Repair and Restore (Recover) Windows Vista Easily


Read more...

Unlock For Us

[How] Hack Attack: Easily Backup and Restore the Saved Passwords in Google Chrome

Vulnerability: Without using any tools beside Google Chrome itself, you can decrypt and view any passwords easily.

UNLOCK FOR US DISCLAIMER NOTICE:

This Articles must not be used in any fraud, deception, illegal transactions and activity. This is for Educational Purpose only. UnlockForUs author (me) including the owner (me) and other Partners (websites), will not be responsible or liable in any way as a result of using this software or guide. By Reading this articles means you accept our Disclaimer Notice.

Where and How to Get and backup the Password File (SAME User only)

1. Show all the Files: Open Windows Explorer > Folder Options > View Tab Show Hidden Files and Folders

2. Go to the Hidden Google Chrome Data Folder

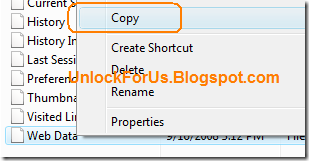
3. Just copy the Web Data File

copy

and back up/copy the file to any directory.

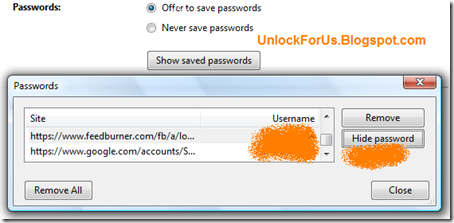
4. If the time will comes that you need to restore Several passwords because your username(s) and password(s) do not login correctly. Just Copy the backup file and overwrite the file. Open the Web Browser and Click the Small wrench > Options > Minor Tweaks and Click the Show Saved Password.

hackattack

Enjoy Learning!

Read more:

Updated [Google Chrome] Sync your Bookmarks / Favorites Across Two or more Computers (Passwords too!)

Directly Download Youtube Videos in Google Chrome (iUnlockThis: Youtube Hack Part 2!)

Tips and tricks: Google Chrome Secret Pages Hack!

[How] Opening Google Chrome Files: History, Archived History, Cookies, Thumbnails and Web Data

[How] Opening Google Chrome SQLite V3 Database Files

Google Chrome Temporary Files location (Cache), Bookmarks/Favorites Database Hack!

Turn Off Aero using a Keyboard Shortcut

Unlock For Us YouTube Hack!


Read more...

[Google Chrome] Sync, Backup, Export your Bookmarks/Favorites Across Two or more Computers

Google ChromeUnlockForUs.Blogspot.com: Most of us are wondering why and where is the Bookmarks located, and is it like the Favorites folder in IE? Can we copy or duplicate it from your laptop to desktop PC? You have hundreds of websites saved and you want to sort it out in Chrome. How?
Read This First: Here's a complete documentation about Temporary files and it's Bookmarks Location:

Google Chrome Temporary Files location (Cache) location

How Do I Sync or Copy the Bookmarks in Two or more computers

1. Open Windows Explorer > Folder Options > View Tab Show Hidden Files and Folders

2. Go to the Google Chrome Data Folder

copyfolder 

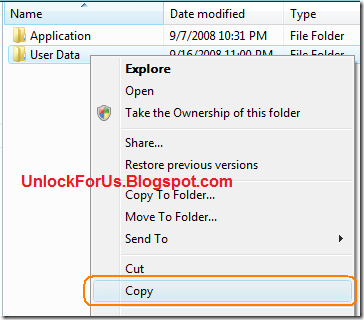
3. To sync it to several computers just copy the entire User Data folder and paste it on the same location across the computers.

That's it! I hope this helps...

Note: This will create a copy of the Entire Cache of the previous computer not only the Bookmarks but the Search History, Temporary Internet Files, and others. Even viruses if the cache have one.

You can also experiment with it and copy the Bookmarks File only:

C:\Users\LawrenceAlbert\AppData\Local\Google\Chrome\User Data\Default\

Because of CryptProtectData, If the entire User Data Folder will be copied:

Passwords will not be copied because It can be decrypted on the same machine only.

Enjoy! :)

Read more:

NEW [How] Hack Attack: Easily Crack the Google Chrome Saved Password using the Built-In Decryption Utility Feature

NEW Directly Download Youtube Videos in Google Chrome (iUnlockThis: Youtube Hack Part 2!)

[How] Opening Google Chrome Files: History, Archived History, Cookies, Thumbnails and Web Data

[How] Opening Google Chrome SQLite V3 Database Files

[Direct-Download] What is Google Chrome?


Read more...

Unlock For Us

System File Checker Tool: Scans, Checks and Restore Corruptions in Windows System Files

System File Check is the most accessible  way of maintaining your computers integrity. What is System File Checker? It is a utility in Microsoft Windows that allows you to scan and fix corruptions in system files. This utility is already available on Windows 98, Windows 2000, Windows XP, and Windows Vista.

Untitled

In the Windows 2000, XP and Vista (NT Family), SFC scans files using Windows File Protection.

winbubble Using WinBubble you can easily access this great feature in Windows Vista easily without memorizing the command: If you press YES to Continue: You will be asked if You want to Check and Repair (YES option) or Check Only (NO Option). That's it.

Commands Needed:

sfc /scannow - scans all protected system files and replaces incorrect versions with correct Microsoft versions

sfc /verifyonly - It will Only scans or check all system files for possible corruptions.  

for more commands: type: sfc /? or sfc only

Example: Windows Vista

Microsoft (R) Windows (R) Resource Checker Version 6.0
Copyright (c) 2006 Microsoft Corporation. All rights reserved.

Scans the integrity of all protected system files and replaces incorrect versions with correct Microsoft versions.

SFC [/SCANNOW] [/VERIFYONLY] [/SCANFILE=<file>] [/VERIFYFILE=<file>] [/OFFWINDIR=<offline windows directory> /OFFBOOTDIR=<offline boot directory>]

/SCANNOW        Scans integrity of all protected system files and repairs files with problems when possible.
/VERIFYONLY     Scans integrity of all protected system files. No repair operation is performed.
/SCANFILE         Scans integrity of the referenced file, repairs file if problems are identified. Specify full path <file>
/VERIFYFILE       Verifies the integrity of the file with full path <file>.  No repair operation is performed.
/OFFBOOTDIR     For offline repair specify the location of the offline boot directory
/OFFWINDIR      For offline repair specify the location of the offline windows directory

e.g.

        sfc /SCANNOW
        sfc /VERIFYFILE=c:\windows\system32\kernel32.dll
        sfc /SCANFILE=d:\windows\system32\kernel32.dll /OFFBOOTDIR=d:\ /OFFWINDIR=d:\windows
        sfc /VERIFYONLY

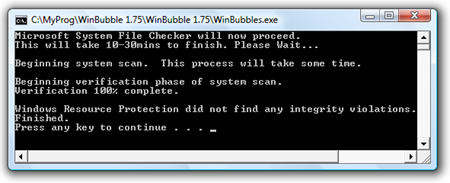
If your Computer is Normal as shown in the Picture Above, this message will appear:

Verification 100% Complete.
Windows Resource Protection did not find any integrity violations.

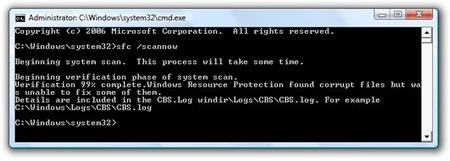
Problems Occured. Corrupt and Modified Files was found:

sfc2result

Windows Resource Protection found corrupt files but was unable to fix some of them. Details are included in the CBS.Log windir\Logs\CBS\CBS.log. For example C:\Windows\Logs\CBS\CBS.log

What will you do?

1. Open Cmd.exe as Administrator and Launch sfc /scannow

You must be an administrator running a console session in order to use the sfc utility.

Type cmd in Start Search and press CTRL+Shift+Enter or Right-Click > Run as Administrator

2. If System File Checker cannot fix the problem, Open CBS.log and find these words:

[SR] Cannot repair member file

3. Once you find this... Look for the name of DLL files.

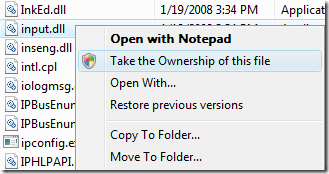
4. Open WinBubble > Click to Check and Add "Take the Ownership of this File" > Press Apply Button

5. Go to the DLL File Directory (usually C:\Windows\System32) that has a problem > Right-Click and Choose "Take the Ownership of this file"

takeown

Note: You Need to do this to all the Affected files.

6. Re-Run the command sfc /scannow or just manually Get the File from Windows Installer and Paste to Overwrite the modified file.

7. Finally, Check it again: sfc /verifyonly

If this doesn't work: Restore your copy of Windows


Related Topics:

New How to Make/Create a Bootable USB Flash Disk Windows Vista Installer

How to Restore Windows Vista Icons

[Vista] How to Restore Folder Icons to Default

How to Restore DVD Drive Label / Names in Windows Vista


Read more...

[Help] How to Fix, Repair and Restore (Recover) Windows Vista Easily

This utility in Windows Vista is the most useful tool that Microsoft created. I had several experiences in which Vista is unbootable, very slow and sometimes hangs due several reasons such as installation of Softwares (Freewares and sharewares), badly written drivers and viruses that inject some code to windows system files.

restorevista

The tool is called Windows System Restore.

Some people may give you suggestions to disable this feature to speed up vista but for me, disabling system restore will only prevent you to recover your Windows OS easily.

Useful Tip: Prevention is better than cure

Use WinBubble to Add a Context Menu (Right-Click Menu) and use it to create a restore point manually before installing or changing anything in your Windows Vista OS like software installation and changing System Files. Read This First: "Create a Restore Point" Right-Click Menu

UnBootable Windows Vista OS

I encountered this problem several times before Vista Service Pack 1 was released. Most of them was solved by using Windows System Restore Tool not the Start-up Repair Tool.

  1. Please check if your Bios settings will boot first to CD/DVD. Afterwards, Insert the Windows Vista Disc.
  2. Press any key to boot from CD or DVD...
  3. A "Install Windows" Window will open and Click the Next Button. What if you don't have a Vista Installation Disc? Don't worry, If your Desktop computer/Laptop came from the famous Manufacturers like DELL, Sony, HP, Lenovo (IBM), ASUS, ACER, Panasonic and others, It's almost the same... Some of the files needed for Recovery is already installed in a separate package. Just find the Menu option to Repair your computer during boot.
  4. Click the Repair your Computer Button and wait until System Recovery Options Window Appears... Choose the drive of Vista Installation that you want to repair and click the the next button.

Start-up Repair Tool

"Your Computer was unable to start...Startup Repair is checking your system for problems..." It will take time to find and fix problems automatically so, please wait...

If Start-up Repair cannot fix your computer automatically, Click the View advanced options for system recovery and support link and Choose System Restore.

System Restore Tool

If Start-up Repair cannot find and fix the problem that prevents Windows from starting automatically, this is your second option and usually this feature can fix the problem. It will restore your OS configuration (System files), installation and programs to a previous date while leaving your personal data and files intact.

So, just Choose the date of Restore point that you want to restore and wait. That's it! Hopefully, this will fix the problem.

Windows Vista is Still Accessible But very slow, some Functions doesn't work, Programs are not working properly, it stops responding and sometimes hangs

First Thing that you have to do is to run System File Checker Tool and check if System files was modified or corrupted.

sfc /scannow

If your not a Geek, IT or Computer Technician, go to the Second option. If you wan to learn more, Please read this detailed guide about sfc.exe:

System File Checker Tool: Scans, Checks and Restore Corruptions in Windows System Files

Second Option

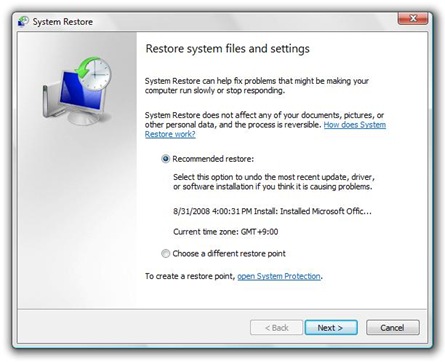
systemrestore

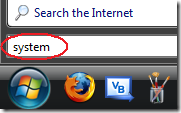
systemrestore2You can launch the Windows System Restore through Start Search and searching "rstrui.exe". Alternatively, you can just type "system" to open System Restore.


Once System Restore is open, Choose the second option (Choose a different restore point) which is more convenient because you can select which date of restore points you want to use.

Please wait for several minutes... That's it!

Note: System restore is reversible, it will not change or delete any existing documents regardless of the time and date it was created. so it's practically safe to use...

Once you encountered these problems and tried this guide, I'm sure you'll say "this guide is really simple and helpful..."

Enjoy Learning Windows Vista!!!

Related Topics:

New How to Make/Create a Bootable USB Flash Disk Windows Vista Installer

New [Vista] FIX: Your phone is in file transfer mode and cannot be used with PC Suite...

How to Restore Windows Vista Icons

[Vista] How to Restore Folder Icons to Default

How to Restore DVD Drive Label / Names in Windows Vista


Read more...

Unlock For Us

Google Chrome Temporary Files, Bookmarks Location and Others

This guide can be use to create applications in accessing Google Chrome's Cache location or Temporary Internet files Database.

shortcut

Let's start on how did I find out.

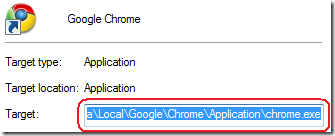
1. Right-Click the Google Chrome Icon and Properties

2. Get the Target value (up to Chrome Folder only) and paste the following to windows explorer:

Windows Vista:

C:\Users\[USERNAME]\AppData\Local\Google\Chrome\

Windows XP:

C:\Documents and Settings\[USERNAME]\Local Settings\Application Data\Google\Chrome\

3. Now you will see the User Data Folder and From the name itself, you can say... This is it!

4. Continue Browsing and open the Default Folder

C:\Users\[USERNAME]\AppData\Local\Google\Chrome\User Data\Default

Gotcha! (This is where the Bookmarks File is also located)

How About Copying or Backup all settings to another computer like Bookmarks and others? read here

5. You know know the locations of the files and folders. Next step is knowing what are these files and what kind of database Google Chrome is using.

Note: Close the Web browser (Google Chrome only) before applying the next steps.

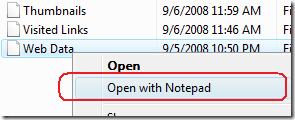
6. If you already downloaded WinBubble and added the "Open with Notepad" Context Menu. You can access these files easily.

To Add the Right-Click Menu:

Open WinBubble > General Tab > Add more options to Explorer's Context Menu (Right-Click Menu) Group > Click to Check "Open with Notepad" and press "Alt-A" or just click the Apply Button

openwithnotepad

7. Use the "Open with Notepad" Context Menu to load the Web Data File

SQLinNotepad

Yes! Although there are several ways to find out the database used, One of them is by downloading the Source code but as a Geek, this is the quickest one. Now we can say Google Chrome is using SQLite v3.

NEXT Opening and Hacking the Files (Bookmark location and others) One by One  

1 2 3


Read more...

[How] Opening Google Chrome SQLite V3 Format Database Files

Note: It is required that you must read the previous article to find out where the files are located and to learn how did I find out that it's an SQLite V3 Database.

How can we open or view the Google Chrome's Internet History files Database and find where Chrome Favorites (Bookmarks) is located?

1. Download SQLite Browser Program at SourceForge.Net.

2. If There's an error while opening the files in Windows Vista. e.g. "This application has failed to start because MSVCR71.dll was not found...".

Search and Download the DLL file and put it on the same directory of the Database Browser Program.

msvcr71

Please Read more Possible Applications: Synchronize your Bookmarks / Favorites Across Two or more Computers (Passwords too!)

NEXT Reading and Unlocking the Files

1 2 3


Read more...

[How] Opening Google Chrome Files: History, Archived History, Cookies, Thumbnails and Web Data

You already located the files, learned how to view and read the Chrome Cache

Now, Let's explore all of them.

1. History File

Note: Again, you can only view the database if Chrome is closed.

Open the Database by pressing CTRL+O.

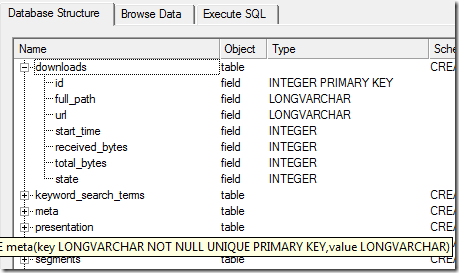
In Data Structure Tab, we can see all the Structure of the database. Using the tool, we can make a program that can access and read the Chromes Cache without seeing the source code. 

historystructure1

In the Browse Data Tab Choose the Table Downloads to access and view the list of files that has been downloaded including the location.

browsedataTab

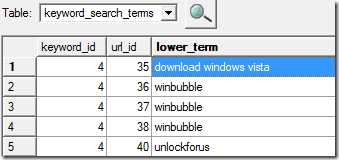
You can even see the Keywords that you have used while searching by choosing keyword_search_terms Table

keywordterms 

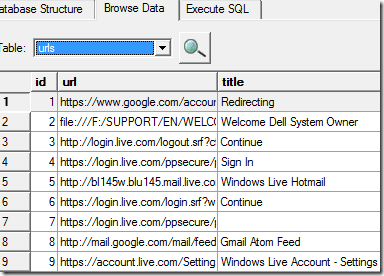
urls Table: Complete list of the previously visited web sites

visitedurls

2. Bookmarks File - This is where Favorites are saved

OpenwithNotepad

Using WinBubble "Open with Notepad" you can easily open the file.

bookmarksbar

This is really important because if you want to create a program that can sync the bookmarks to several computers. That's great!

Read here

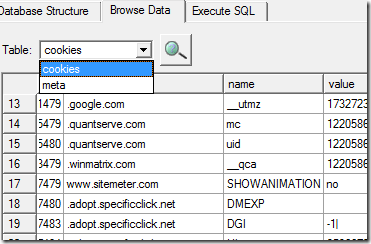
3. Cookies file

This is where the cookies are stored. How about the encrypted ones? (username and passwords...Look For Web Data File) It's encrypted, you need to decrypt the value to see the actual password. Please Read here

cookies

There are many exciting things that you can discover in this data... I'm sure in the coming days... There are many programs that will be created and provide an interface to these information's.

4. Thumbnails file – This is where the thumbnails are stored. If you want to refresh the pictures. Simply delete the file.

thumbnails

This will be the results… As soon as you visit the website, It will be updated.

thumbnailschange2

Please continue Exploring the other files.

Especially the Preference File (Clue: use WinBubble Context Menu again)

ENJOY!!!

1 2 3


Read More Articles:

Updated Directly Download Youtube Videos in Google Chrome (iUnlockThis: Youtube Hack Part 2!)

[Direct-Download] What is Google Chrome?


Read more...

[Help] Where's the Recent Pages Button in Google Chrome? It's Gone!

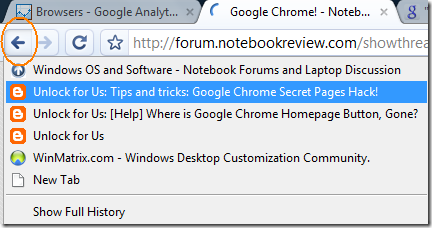
"I wanted to go back and access one of the previously visited web pages but I have noticed that the small drop down arrow - Recent Pages button is missing. Is it hidden?"

ie firefox

Recently, more and more people are appreciating the speed and simplicity of the New Web Browser. The program was designed in a minimal simple interface but hidden features are buried deep within the browser.

googlechrome

In Firefox where the Recent Pages Button is too small to click, now gone in Google Chrome Web Browser.

Minimal Interface Design...

How? You can push the Backspace Button several times or Just Click and Hold Down the Forward/Back Button...

Enjoy!


Read more:

Tips and tricks: Google Chrome Secret Pages Hack!

[Direct-Download] What is Google Chrome?

NEW Google Chrome Temporary Files location (Cache), Bookmarks/Favorites Database Hack!

NEW [How] Opening Google Chrome SQLite V3 Database Files

NEW [How] Opening Google Chrome Files: History, Archived History, Cookies, Thumbnails and Web Data

[Help-Files] Find, Edit and Change Google Chrome Download Directory Location

[Help] Where is Google Chrome Homepage Button, Gone?


Read more...


© Unlock For Us @2024| Blogger| License Agreement