![]()
Mr Dave Glover of Blogs.MSDN.com wrote a guide on how to create a USB Thumb Drive Vista Installer. The article is interesting because recently a friend of mine wishes to install Windows Vista onto a laptop in which DVD drive is not working anymore (it's already dead).
BTW, this is really useful for all DVD less laptops. So, I wrote a Complete Step-by-Step Beginner's Style Guide on how to do it easily, Not Just For the Geeks But For All.
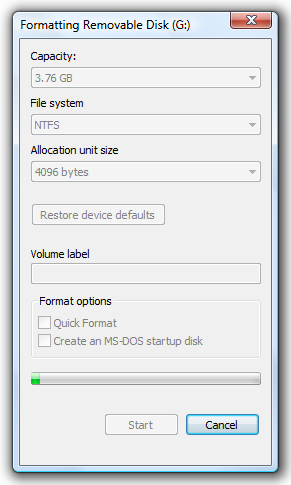
1. Format the USB Stick as NTFS: Open Windows Explorer and Right-Click the Drive > Choose the Format Option
2. In the File System Combo box, Choose NTFS and Click the Start Button to begin.
3. Afterwards, Open the Command Prompt as Administrator: In Start Search type, cmd > Press CTRL + Shift + Enter
or you will get... "Access is denied" Message after launching diskpart command.
4. Setting the USB Partition Active (Diskpart.exe)
a. In the Command prompt, type: Diskpart and press Enter
b. Please wait for a while and type: list volume and press Enter
- The command will let you see all the drives and partitions
c. Find which volume for your Removable USB Drive, in my case 6, Therefore Type: select volume 6 and press Enter again
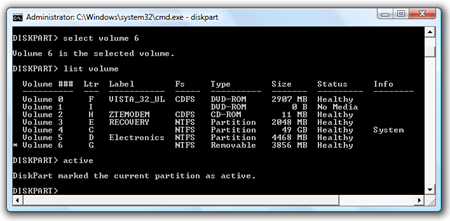
d. type: active and press enter
| DiskPart marked the current partition as active. |
To learn more about the commands, press ? and Enter Key.
Now you already finished setting the volume active so, type the command Exit and press Enter Again
5. Create a Boot Sector (bootsect.exe)
What is Bootsect? In the Command Prompt, enter the following command to learn about the tool: bootsect /?
| SYNTAX: bootsect {/help|/nt60|/nt52} {SYS|ALL|<DriveLetter>:} [/force] Boot sector restoration tool Bootsect.exe updates the master boot code for hard disk partitions in order to switch between BOOTMGR and NTLDR. You can use this tool to restore the boot sector on your computer. Run "bootsect /help" for detailed usage instructions. |
It is located at your Windows Vista installer directory called \boot
1. Let's go back to the guide...First, Find where's your DVD Drive is located (Windows Vista Installer) and go to the boot directory, which in my case Drive F:
Next, type: bootsect(space)/nt60(space)Flash Drive Letter
| C:\Windows\System32>f: F:\>cd boot F:\BOOT>bootsect /nt60 g: G: (\\?\Volume{e5e56f28-84e3-11dd-bd4b-00188bdb682d}) Successfully updated NTFS filesystem bootcode. Bootcode was successfully updated on all targeted volumes. F:\BOOT> |
6. You have now successfully created a Boot Sector for the Vista Installer... Finally, Open Windows Explorer > Go to the the Windows Vista Installer DVD Drive and Copy these Files and folders onto the USB Stick:
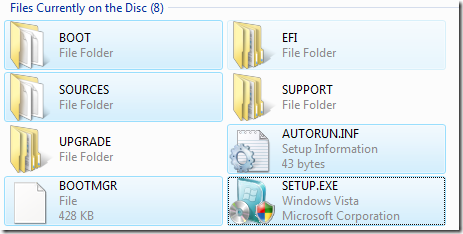
1. Boot Directory
2. Sources Directory
3. Files in the root directory (drive)
That's it!
Now you have a USB Stick Bootable Vista Installer... which BTW Rocks! (As Mr David says... Anyway, Me too!!!)
It's very useful in troubleshooting and fixing Windows Vista problems e.g. Unbootable, infected by a virus, very slow and many more.
Enjoy Learning Windows Vista!!!
Read more Articles:
Useful System File Checker Tool: Scans, Checks and Restore Corruptions in Windows System Files
Useful [Help] How to Fix, Repair and Restore (Recover) Windows Vista Easily
1 Comment:
Cool...
Post a Comment