This is your Ultimate Guide, easiest and complete How-To Article in Sharing Internet Connection using Windows 2000, XP and Vista.
WIRED NETWORKING BASICS

More than Five years ago, during the summer of 2003 I applied for On-the-Job Training for 1.5 months in a Communications Company. Luckily, they let me study and experienced what's life as a Data Communication Engineer.
That time, I really wanted to explore Communications Engineering and learn more about Microwave, Satellite, ISDN and Fiber Optics. Although I already know How to create a Network in Windows and some background on Microwave designs but there are many questions in my mind.
How DSL Works in the real world? What are the devices needed? How can you connect to other computers in Public IP settings like in P2P? What is DSLAM? I have so many questions...
Most of the small Internet Cafe that time doesn't use a router to connect to the Internet because it is still expensive (but getting cheaper day by day) thus, DUAL LAN-CARD/ETHERNET CARD NETWORKING is Popular.
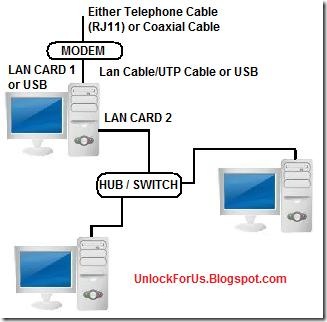
Here's the Network Diagram: Figure A
Two Computers

Connect the two computers using UTP/LAN/CAT5 Network Cable
Three or More Computers
Sharing Internet using a Router: Figure B

Wireless Broadband Routers: Figure C

Networking Without a Router: Figure A
Cable Modem: The incoming line coming from the Cable Box uses Coaxial Cable and the line going to the computer uses USB or Lan Cable.
DSL Modem: The incoming line uses the Plain-Old-Telephone-System (POTS) and the line connected to the next computer or hub uses UTP/Lan Cable.
To setup DSL or Digital Subscriber Line PPPOE Connection, You need to input the Username and password to use the Internet. Please Read here for more information.
Internet Protocol (IPv4) Address Settings Example:
Gateway Computer
Lan Card 2: The LAN CARD Connecting to your Switch or HUB
IP Address: 192.168.0.1
Subnet Mask: 255.255.255.0
Other Computers (you can set this automatic or enter the settings below)
IP Address: 192.168.0.2 - 192.168.0.255
Subnet Mask: 255.255.255.0
Default Gateway: 192.168.0.1
DNS Server: 192.168.0.1
Note: The same Procedure in Windows 2000, XP and Vista
To Add the Settings Above:
Press Win+R > type ncpa.cpl > Right-click the Local Area Connection 2 or Different Name that corresponds to the second Ethernet Card > Properties > Click the "Internet Protocol version 4 (IPv4)" > Properties
To check: Open Command Prompt and type: ipconfig
Enabling / Activating / Setup Internet Connection Sharing (ICS)
1. From my Quick Tip: Open Network Connection Window by simply launching the command: Press "Win+R" > ncpa.cpl or Control ncpa.cpl
2. Select the local area network (LAN) Card for DSL or Cable Internet, WAN Miniport (PPPOE) for iBurst, USB Modem for 3G, GPRS, HSDPA or any type Dial-up Networking that provides you a primary Internet Connection > Right-Click Properties
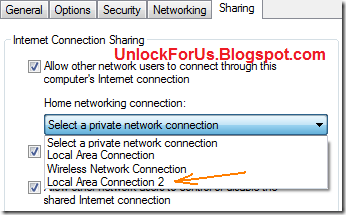
3. In the Sharing Tab (Advanced Tab in Windows XP), Click to check the option "Allow other network users to connect though this computer's Internet connection" and Finally, Choose Local Area Connection 2 or any name that corresponds to the Second LAN Card connected to another Computer or Hub.
NOTE: If you are using 3G or HSDPA as your primary connection to the Internet. You will encounter this Message "Since this connection is currently active, some settings will not take effect until the next time you dial it.": Just Neglect it

Networking With a Router: Figure B
Usually, the guide is indicated in the manual of the router. There are many different kinds or ways to set the settings but uses the same principle as Figure A.
Different Ways
1. Setting the IP Address through a built-in web-server LAN program in the router. Open IE and type http://192.168.1.1
2. Setting the IP Address through Telnet or Hyper Terminal
The Simplest Explanation to Remember: Router is being used as a gateway and to connect to the Internet instead of using a separate computer. Thus, If your inputting Username and Password in PPPoE Connection you must set it inside the router.
Wireless Access Point: Figure C
The Network uses the same procedure in Figure B except you will only use one or two devices with more features like additional Wireless LAN Capability (802.11 a/b/g/n).
AD-HOC Networking
The procedure is the same with FIGURE A.
Enjoy Learning!!!
0 Comments:
Post a Comment