Unlock For Us

UnlockThis! Windows Vista Benchmarking tool

Windows System Assessment Tool (WINSAT), is a free benchmarking tool that measures various performance characteristics and capabilities of a computer running in Windows Vista and Windows Server 2008.

1. 3D benchmarks
a. In the command prompt(RUN as administrator), type "winsat aurora"

aurora
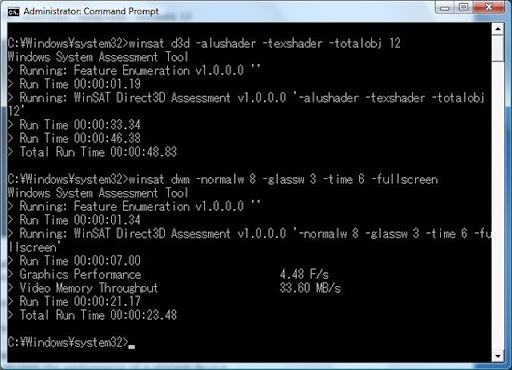
b. Winsat D3D, evaluates a computer system ability to run D3D based applications such as games.
Note: Run the command prompt as administrator and type the following
Example: winsat d3d -alushader -texshader -totalobj 12

d3d

2. Aero benchmarks
Winsat DWM
, evaluates computer system ability to display the Aero desktop effects.
Note: Run the command prompt as administrator and type the following
Example: winsat dwm -normalw 8 -glassw 3 -time 6 -fullscreen

aero

3. Hardisk Benchmarks
WINSAT DISK
- evaluates the performance of a storage device
Note: Run the command prompt as administrator
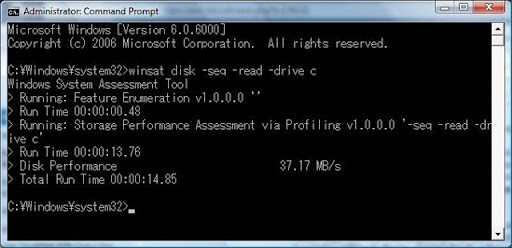
a. Sequential I/O read performance of drive C:
winsat disk -seq -read -drive c

Hardiskseqread

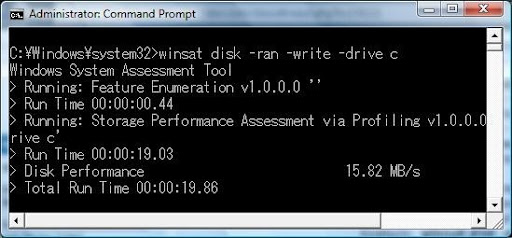
b. Random I/O write performance of drive number
winsat disk -ran -write -drive c

Hardiskwrite

c. flush performance of drive C:
winsat disk -flush -drive c

4. CPU Benchmarks
Winsat CPU
- evaluates the performance of the processors using encryption and decryption or compression and decompression.

encryption - encryption and decryption sub-assessment using 256-bit AES cryptographic algorithms.
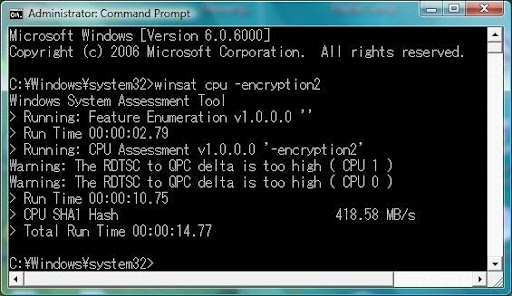
encryption2 - encryption and decryption sub-assessment computing using a SHA1 hash
compression - compression and decompression sub-assessment using a Lempel-Zev algorithm.
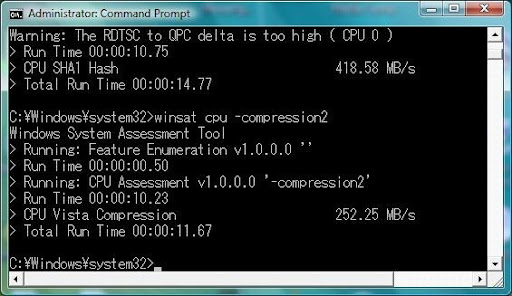
compression2 - CPU performance test using the same compression algorithms that Windows Vista uses internally, same algorithm used to compress the hibernation file and with ReadyBoost and ReadyDrive technologies.

Examples

(Note: Run the command prompt as administrator and type the following)

a. winsat cpu -encryption2

cpuencryption2

b. winsat cpu -compression2

cpucompression2

Related Topics:

How to Get the Windows Experience Index (WEI) score of a Network Computer

Fun Stuff! Hack your Windows Experience Index (WEI) score

Windows Vista Unlocks


Read more...

Unlock For Us

UnlockMe! Secure logon for Windows XP and Vista

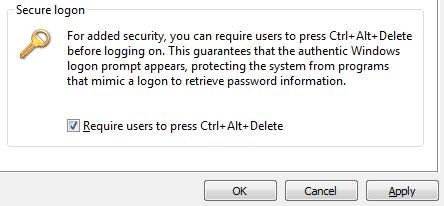
Secure Logon is a common feature of office computers on a domain network which guarantees an authentic login prompt, protecting the system from programs that mimic a logon to retrieve password information.

securelogonVista

Enable Secure Logon in Windows Vista

  1. Type netplwiz in the Run window (Windows+R) or Start Menu’s Search box
  2. Click "Continue" button if UAC is turn on. In the Advanced User Account window, click the Advanced tab.
  3. Select the Require users to press Ctrl+Alt+Delete check box.

 Enable Secure Logon in Windows XP

  1. Go to Start menu-> Control Panel (Classic View) -> User Accounts 
  2. In the Advanced User account window, click the Advanced tab.
  3. Select the Require users to press Ctrl+Alt+Delete check box.

How to use:

You have to press Ctrl+Alt+Del on your keyboard to unlock your computer before you can logon to Windows.


Read more...

Unlock For Us

UnlockThis! Windows DVD Maker, create your own Professional-looking video DVDs

logo Windows DVD Maker introduces an easy and simple steps in creating a professional-looking video DVDs and pictures that can be opened on your standard DVD players, regardless of your geographical region codes. It serves as a companion program to Windows Movie Maker and available in Windows Vista Home Premium and Windows Vista Ultimate edition.

Important settings that you must check before creating a Dvd movie:

1. Hardisk space, you should have a free space for temporary files that are created when making a DVD. (At least 5gb)

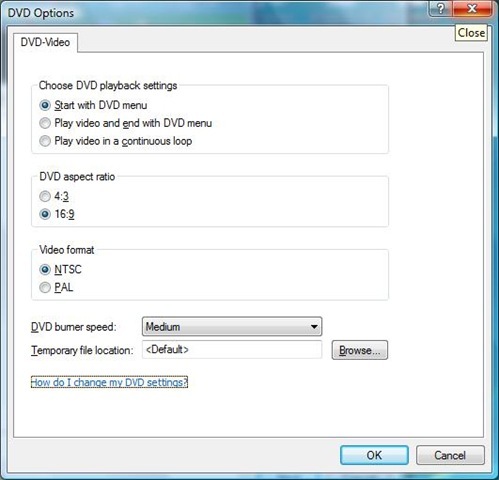
2. Video format: NTSC or PAL, check this options after adding the files into the Windows DVD Maker.

3. DVD aspect ratio: 4:3 (standard) or 16:9 (widescreen), if you did not set this option, video files in a widescreen format will be stretch if the standard setting is used (4:3) and vice-versa.

How to burn and change Windows DVD Maker Options/Settings:

  1. Open Windows DVD Maker->Choose Pictures and Videos. On the Main window (Add pictures and video to the DVD window), change the title of the disc.
  2. Put videos and pictures using "Add items" button. You can arrange them afterwards by clicking Move up and Move down button.
  3. Click Options, don't forget to check and change the settings.

dvdoptions

4. Click Ok.

After that choose the menu style that you want. If you like to customize it, edit text, add some videos (foreground and background) and audio, go to "Menu Text" and "Customize Menu".

If not, just click the burn button.

I have encountered these problems while using Windows DVD Maker because I did not check the above settings. So, I would like to share this to all of you.

Enjoy!

Other Topics:

CPU-Z, a useful System Profiler tool

Quicktip: How to prolong your Laptop Battery

CDBurnerXP, burns Blu-Ray and HD-DVDs for FREE

Windows Xp, Web, Software Reviews and Hacks

How to Open/Load .ISO Files in Windows Vista/XP

Windows Vista Unlocks


Read more...

Unlock For Us

Login Automatically in Windows Vista, Removes or Disables the Welcome Screen

This is a quick information that allows your computer to logon automatically at the startup of Windows Vista (Also Works in Windows 7). You can select and set the user account that will be use during the startup.

Login Automatically in Windows Vista

<<-Advanced User Accounts Control Panel->>

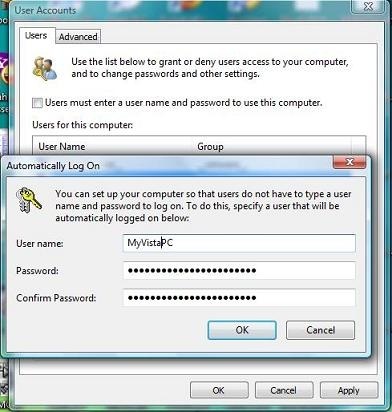
Open the RUN window (Press Windows+R)->type "netplwiz" and press Enter. Select "Continue" if the UAC pop-ups.

autologon

In the Advanced User Account window, uncheck the checkbox "User must enter a username and password to use this computer.", then click the "Apply" button. Once the Automatic Log On Window appears, set the username and password that will be use during the startup of Windows Vista.

For Windows XP or manually setting in the registry, Read here.

Simple but sometimes useful… It removes your annoyances. Enjoy!


Read more...

Unlock For Us

UnlockMe! "I can't see my new hardisk"

This is a question that I encountered last week. "Yesterday, I bought a SEAGATE SATA hardisk. But when I opened my computer, running in windows XP, I can't see my new hardisk in windows explorer. Please help..."

After you bought a hardisk in the shop, always ask the computer technician if it is already formatted and it has a partition or not. Because when you buy a hardisk, usually it has no partition and not yet formatted. That's why you cannot see the hardisk in windows explorer.

Here's a complete guide to create a partition and format the hardisk in Windows XP.

1. Open the Control Panel -> Administrative Tools -> Computer Management

2. In the Computer Management tool, Click "Disk Management".

3. You will see the "Unallocated disk', this is your new hardisk.

Right-Click->click New Logical Drive.

4. In the New Partition Wizard, click Next.

5. Click the type of partition that you want to create (either Primary partition, Extended partition, or Logical drive),

For simpler explanation: use Primary partition, if you want to make it bootable. You can create up to four Primary partition. If you will use it as data  storage only, use the Extended Partition.

For example: If your computer has only one partition (c:). You can use a Primary partition for your new hardisk (d:). But if you want to make a two partition (say d: and e:) in your new hardisk, use Primary partition in the first drive and Extended partition for the second drive (e:). In depends on you, as long as you use up to four primary partition.

6. Specify the size of the partition in the Partition size in MB box, If you want to make a single partition, click Next. If you want to make a two partition, input the size of the first hardisk partition that you will create.

7. Next I suggest let the system automatically enumerate the drive (default option, no modifications) and then click Next.

8. In choosing the formatting options, Use the default options. Please check if it is NTFS and then click Next.

9. click Finish.

10. If you want a two partition, repeat the steps above and choose the default options only, especially in number 6 by clicking NEXT button until Finish. No more modifications in the options. This means that you will use the entire unallocated disk space left.


Read more...

Unlock For Us

UnlockForMe! "Access denied", opening a folder or file in Windows Vista/XP

This is a request from katherine, she wants to open and delete a folder but it says "Access is denied".

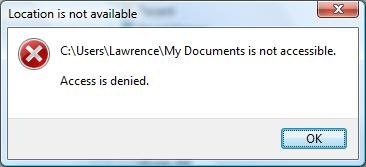
When you try to open a folder and files in Microsoft Windows Vista/XP, you may receive the following error message, "Access is denied."

Usually in Windows Vista, you may encounter this in opening "UserName" folder > My Documents, My Videos, My Pictures and My Music folder.  Also you will notice that they are displayed as a semi-transparent icon with a shortcut symbol. These are called NTFS Junction point. Windows Vista uses them to maintain backward naming compatibility and redirect programs that accesses these folders.

mydoc 

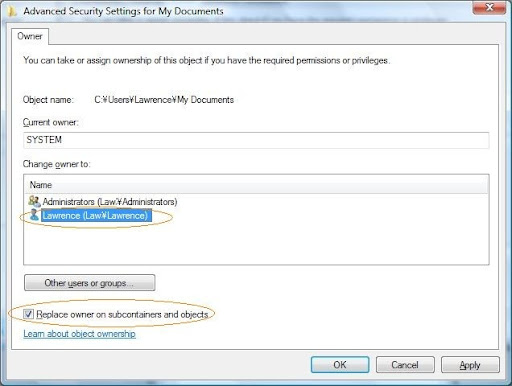
The solution is taking the ownership of system files or folders that you want to open or modify.

The same situation in deleting files that has been created by another user.

Read First: Notes Before Taking the Ownership of File and Folder

LONG METHOD:

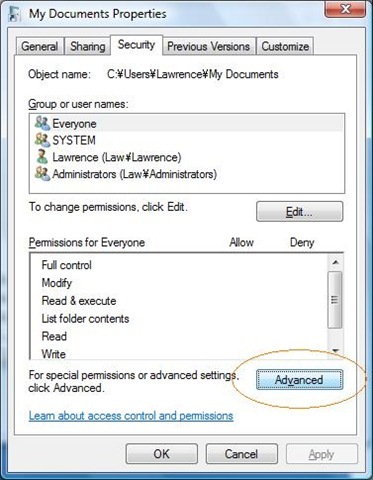
1. Right click the folder->Security Tab->Advanced->Edit

advanced edit


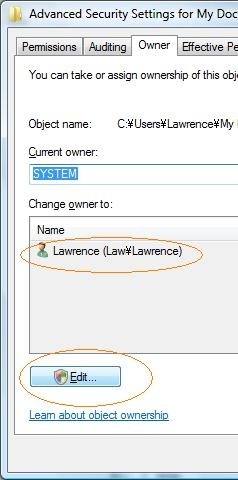
2. Select your Username and click the checkbox option->Apply.

ownership

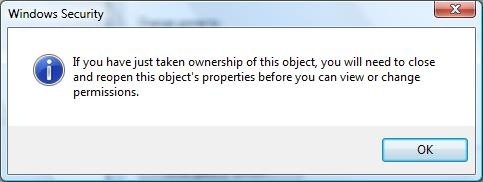
3. Click Yes. You can now open the folder.

success

Note: You can use this procedure in Windows XP.

SHORTCUT METHOD: (Windows Vista only)

1. Download and use WinBubble to Add "Take Ownership of this folder" feature in Windows Explorer's Context Menu.

2. To Unlock Files, use WinBubble to Add "Take Ownership of this file" feature in Windows Explorer's Right-Click Menu.

Documentation of WinBubble:

Unlocking WinBubble Part 1

To download WinBubble, Click Here

For more Advanced Taking the ownership Example: Read Here

Enjoy!


Read more...

Unlock For Us

UnlockMe! Ten ways on enhancing your Windows Vista User Experience

logo

In this article, we will tell you in ten ways to improve your User Experience in Windows Vista without using third party tools.

Anyway, I recommend to Download and Use WinBubbles to ultimate enhance your Vista Experience. Here's the Complete Documentation

1. User Account Control
A security feature in Windows Vista that always ask a permission to run or install some applications, sometimes it is so annoying that you want to turn it off. Even if a user may have administrator privileges, but an application that the user open will not run unless it is approved or the user authorizes it. It is a security model that other operating systems such as Mac OS X and Linux have employed for years and had proven to be effective.

To turn it off go to Control Panel -> User Account -> Turn User Account Control on or off. Uncheck the option below and restart your computer.

Note: UAC make your computer more secure and prevent viruses, malware to do something in your computer without your consent. It helps to prevent malicious programs silent installation and computer-wide infection, Microsoft developed the UAC feature for Windows Vista. I RECOMMEND that turn off UAC, only if you have an anti-virus, anti-spyware, anti-malware and anti-rootkits installed in your computer. And use firefox when using the Internet because turning off UAC will also turn-off Protected Mode in Internet Explorer.

2. Desktop Icons

I noticed that when you buy a new laptop, some of them, the desktop icons are too large and not proportional to its taskbar and startmenu. To change, press CTRL key and scroll your mouse down and up. Choose the size that is proportional and comfortable with you.

3. RUN window

When I bought my laptop loaded with Windows Vista, the first thing that I have noticed is that RUN command in startmenu is missing. To put it back, Right-click in the taskbar -> Choose Properties -> Start menu tabs -> Customize -> scroll-down and check Run window.

4. Shutdown button

Here's a guide for changing the function of the Start menu power button. I always mistaken this one for shutdown, It goes to sleep rather than shutdown. If you enabled the Run command in start menu click it, if not just press WindowsKey+R. Type "cmd" and press enter. type "powercfg.cpl,1" without spaces. Scroll-down and find these options 'Startmenu power button'.

shutdown

Change the settings to Shut down.

5. Quick Search

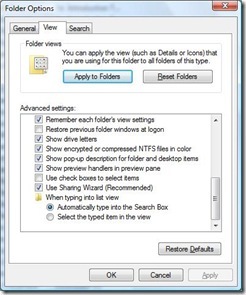
  • Turn-on Quick search, this is very useful when searching inside a folder.

    quicksearch1

    1. Open the Windows Explorer.
    2. click Organize menu ->
    3. Folder and Search options -> View tab and scroll-down to the bottom.

    Select 'Automatically type into the Search Box' option

    quicksearch2

    6. Windows Update

    These are some issues that we need to resolve after Windows Vista Installation: Poor playback quality of HD-DVDs and Blu-Ray when you play on large monitors, Universal Serial Bus issues, improve Windows Media Player and patch Media Center, slow file operations and many more. Windows Vista performed file operations such as copying and deletion runs more slowly than other operating systems. Fixed them by using Windows update.

    a) Press WindowsKey+Pause
    b) Click Windows update which is located down-left side of the screen
    c) Click Check for updates.

    7. Security and Internet

    Windows Vista is the most secure OS that Microsoft has created. But some features need to be manually turn-on. You can read first my previous post on Top ten features of Internet explorer. Click Here.

  • Phishing Filter, a protection against online scams that are considered to be dangerous for a user to enter and is checked against a masterlist of known sites (both local and online service). This is not turn-on by default so you have to manually turn it on in Internet explorer Tools Menu-->Phising filter-->Turn On Automatic Website Checking.

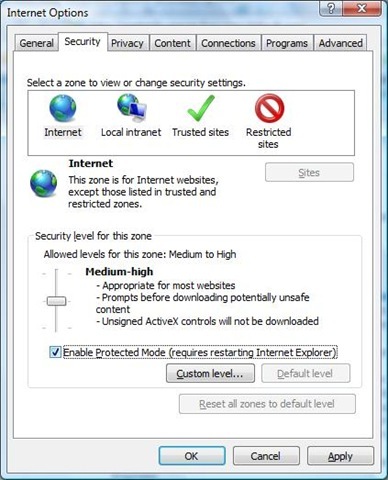
  • Protected Mode, sadly this is available only in Windows Vista. The browser runs in a lower rights that prevents malicious websites to write anything in the operating system beside the Temporary Internet files folder. I will call this feature as 'IE shield'. To check if it is turn-on, Internet explorer Tools Menu-->Options-->Security

    protectedmode

    8. Using Quick Tabs (CTRL-Q), a very useful feature for Internet Explorer users which displays a thumbnail view of opened tabs.

    9. Add "Move to", "Copy to" and "Send to" items in the Context menu to improve file management. Click here to open my previous article.

    10. Set your default programs to always start using administrator account. To set this property, just right-click on any shortcut of your application. Click the Advanced button on the Shortcut page/tab to get to the Advanced Properties window.

    runasadmin

    Click "Run as administrator".


  • Read more...


    © Unlock For Us @2024| Blogger| License Agreement