Unlock For Us

How to Open/Load .ISO Files in Windows Vista/XP

Plenty of programs and installation disc are now compiled in .iso format. ISO File is a disk image of data on a CD-ROM. Sometimes, it refers to any optical disc image and a UDF image. For short, it is a copy of your CD/DVD.

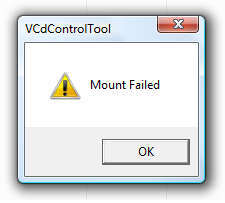
In Windows XP: MS Virtual CD-ROM Control Panel, the nifty small utility from Microsoft can mount it easily for Free.

How about if you open and use it to mount images in Windows Vista? This Error message will appear, "Mount Failed"

vistafailed

Thankfully there's a utility that will do it flawlessly called Virtual Clone Drive.

file association

This feature is the one that I like, It automatically associate the files to mount and open when the user click the file.

There is no need to mount CD/DVD image anymore. But If you like to mount them, that feature is supported...

The software is too simple.

Others:

MagicDisk - This utility is another good competitor and gives you more options Like Encrypts ISO image and Compresses ISO image, Make CD/DVD image from CD/DVD and many more.

Daemon Tools – Try this also


Other Topics:

CPU-Z, a useful System Profiler tool

Windows DVD Maker, create your own Professional-looking video DVDs

CDBurnerXP, burns Blu-Ray and HD-DVDs for FREE

Quicktip: How to prolong your Laptop Battery
Read more...

Unlock For Us

FREE PHP and MySQL Hosting, Web Hosting For Everyone!

If you wish to have a professional shared hosting quality in a free hosting package, This is it! Web hosting for Everyone! 

  • 250 MB of disk space
  • 100 GB of data transfer
  • PHP and MySQL support with no restrictions
  • cPanel control panel
  • No advertising!

Click and open the banner below:

Free Web Hosting

Note: You need to wait one day in some cases

cPanel Powered Hosting
cPanel has a lot of features: Webmail, File Manger (FTP/WEB), Website Redirection, Backups, Password Protect Directories, Subdomains, and much more...

Host unlimited domains!
It allows you to create unlimited physical cPanel accounts. Host as much accounts and domains as you need.

Over 500 FREE website templates
Free POP3 Email Box
Webmail access

What else can you ask for?


Read more...

Unlock For Us

Virtual Girl of the Future, A.I. (Artificial Intelligence)?

amazing girl

This girl freaks me out! She always follow my cursor and randomly, smiles at me. Some says the eyes came from linux/unix app xeyes. But everybody who visited and saw this was amazed.

Artificial Intelligence?

If I will have an opportunity to re-invent the Virtual Girl of the future, I will teach her how to speak, sing a song, teach some vocabulary, reminds me of my task and many more.

Although this may sounds a dream but I hope so...

View the Virtual Girl Of the Future


_______________________________________________________

More Articles:

Fun Stuff! Hack your Windows Experience Index (WEI) score

UnlockMe! Hide your computer in the Network

UnlockMe! Low 'Virtual Memory' warning on Windows Vista

Shutdown, Restart, Lock, Sleep Or Hibernate your Computer using the Middle Mouse Button


Read more...

Unlock For Us

Windows Vista SP1 File Removal tool: Free up more space on your hard drive

This tool will make Windows Vista Service Pack 1 permanent on your computer. Thus, After running the program you will save more space on your computer but you will not be able to remove Vista SP1 anymore.

Freespace

How? Open the Run Window (Win+R), Type vsp1cln.exe and press enter. Press Y and you will see the message "Performing Windows Vista Service Pack 1 Disk Clean-up"

More Articles:

[Vista] Hibernate Button is gone

Partitioning your Drive in Windows Vista using the Disk Management utility

Windows Vista Unlocks, Guides, Tutorials, News, Tips and Tweaks

How to Remove/Disable Start-up programs in Windows Vista

UnlockMe! "Windows has blocked some startup programs"


Read more...

Unlock For Us

Shutdown, Restart, Lock, Sleep Or Hibernate your Computer using the Middle Mouse Button

shutdown reboot

Last time, I wrote several articles and documentation's regarding the Middle Mouse button Customizations in Windows Vista.

Here's another tip: Shutdown, Restart, Lock your Computer / Workstation, Sleep or Hibernate using the scroll wheel button easily.


How?

1. Read the previous article:

How to launch programs using the Middle Mouse button

2. At number 8, Choose which option you want to set and enter the command colored in blue:


Shutdown your Computer

Shutdown.exe -s -t 00

- Force all applications to close and shutdown immediately

or

Shutdown.exe -s      (After 30s...)

---------------------------------------------------------------

Restart Computer

Shutdown.exe -r -t 00

---------------------------------------------------------------

Sleep Computer

Rundll32.exe powrprof.dll,SetSuspendState Sleep

If it hibernates instead of Sleep: Hibernate must be OFF

http://support.microsoft.com/kb/555569

---------------------------------------------------------------

Lock your Computer

Rundll32.exe user32.dll,LockWorkStation

--------------------------------------------------------------

Hibernate Computer

Rundll32.exe Powrprof.dll,SetSuspendState

doesn’t work?: Hibernate must be enabled

http://support.microsoft.com/kb/555569

How to turn off / On the Hibernate feature: powercfg

powercfg -hibernate off

powercfg -hibernate on

That's it!

If the Sleep or Hibernate command is not working. Check first, if your computer supports these sleep states: Open the command prompt (cmd.exe) and type, powercfg -a

_________________________________________________________

The following sleep states are available on this system: Standby ( S3 ) Hibernate Hybrid Sleep
The following sleep states are not available on this system:
Standby (S1)
        The system firmware does not support this standby state.
Standby (S2)
        The system firmware does not support this standby state.

_____________________________________________________

How about in Windows XP? Same procedure. Just install .Net Framework first.

Enjoy!

More Articles:

Eject your CD/DVD using a Keyboard Shortcut

How To Activate Flip 3d using the Middle Mouse Button / Scroll Wheel Button

How To Turn Off Aero using the Middle Mouse Button

Eject your CD/DVD using the Middle mouse button


Read more...

Unlock For Us

[Help] How to Setup Broadband DSL Internet Connection in Windows Vista for a Single PC

dsl

Recently, my friend John ask for help in setting up his DSL (Digital Subscriber Line) connection. Usually, these procedures can be seen in the manuals given by the Telecom company. But unfortunately, he lost all of them...

Things Needed that is usually given by the Internet Service Provider:

1. RJ11 port and cable (Also known as Telephone Cable)

2. 1 meter RJ45 UTP Cable (Also known as LAN Cable)

Connection of Hardware

connection

1. Connect the phone line to your DSL Modem (kinds: VDSL/ADSL/SDSL/RADSL/IDSL Modem)

2. Plug the LAN Cable from your PC Ethernet Card (LAN Card) to your DSL Modem, usually it is labeled as "LAN".

Method 1: Creating a PPPoE Internet Connection in Internet Explorer

1. Open the Internet Explorer > Tools Menu > Internet Options

settting1

2. Choose the second Option (Connect using DSL or cable that requires a user name and password.)

settting2

3. Type the Username and Password given by your Internet Service Provider (ISP). Click the Connect Button and finally, the Apply Button.

settting3

That's it!

4. If the Internet Connectivity test was unsuccessful, Please verify your username and password, and the connection of cables.

settting4

Method 2: Open the Control Panel > Network and Internet > Networking and Sharing Center > On the Left Pane, Click Setup a connection or Network > Choose a connection type, "Connect to the Internet" and click the Next Button. Then Proceed with the Method 1 #2 and #3... That's it!

If it doesn't automatically re-Connect and establish a connection: Go to Start Menu > Connect To Button, and then choose the PPPoE Connection you have created.

Enjoy Learning Windows Vista!

More How to Guides:

NEW Simple Way to Monitor Opened Files in a Shared Folder Across the Network

NEW [Vista/XP] How to Set up Ad hoc Wifi Wireless Networking Without a Router

NEW How to Share Internet Connection in Ad hoc Network


Read more...

Unlock For Us

How to Show/Hide Start Menu Search in Windows Vista Service Pack 1

I Unlock This First!!! (Restore the Original Settings)

Put back my Startmenu Search option! After installation of Windows Vista SP1, tons of users and friends ask me a question in bringing back the Search tool. "Why it was removed? it is very useful.  How to Restore my Search Button in Service Pack one? Bring it back Microsoft!"

After several minutes of thinking, suddenly something pops-up in my head. haha!!! WinBubble did it again! Although, I've just released the latest version of WinBubble, This is NEEDED. WinBubble 1.71

How to get it back? Download and open WinBubble 1.71 > Desktop Customization group > Click "Enable Start Menu Search" option and then Press Alt-A or just click the Apply Button. Don't forget to Log-Off and Login.

I'm sure tons of Publisher's and users will HACK WinBubble. Haha!

If your a publisher and you want the TWO commands to restore the Settings. Please email me... just give me a credit.

Note: Everybody can copy and paste this article, Please give a link Back to this page.

That's it!

Bad News: Microsoft patched the hack after several days. Anyway, Here's another Solution: Pin the Search Shortcut in the Start Menu


March 20, 2008

Recent News:

Here's what you want guys.
When you see Start_ShowSearch=1
HKEY_CURRENT_USERS\SOFTWARE\Microsoft\Windows\CurrentVersion\explorer\Advanced
Add Start_ShowSearch=1 in HKEY_LOCAL_MACHINE,
The tweak is very simple... :)

Two weeks ago, WinBubble can Bring Back/restore your Start Menu completely after installation of Windows Vista Service Pack 1. But Recently, SOME can't. Microsoft silently patched the hack? *not sure, I don't know...

More Articles:

Windows Vista Tips, Tricks, How to, Help-guides and Unlocks

Installing Windows Vista Service Pack 1

UnlockMe! Hardware Problem After Installation of Windows Vista Service Pack 1

Important Changes to Windows Vista Service Pack 1


Read more...

Unlock For Us

Installing Windows Vista Service Pack 1

Although Windows Vista Service Packs 1 comes with the easy to use system to update its operating system. Beginners are not aware of this. Many of my friends still ask because they are afraid that it may damage their OS.

3

So here's How to install Sp1:

Method 1: Microsoft recommends using Windows Update to download and install Windows Vista SP1 on single PCs because of driver issues.

Method 2:

1. Download the Standalone File from Microsoft, here

2. Check first if you have a disk space available (A minimum of 7 GB free disk space for 32-bit systems and 12GB for 64-bit computers). Laptops must be plugged in to an AC power source.

4. Now, You're ready, just open the file and proceed with the installation.

5. Save you're work, Close all open programs and then click the Install button. It will take an hour or more... Enjoy!


More Articles:

UnlockMe! Hardware Problem After Installation of Windows Vista Service Pack 1 

Important Changes to Windows Vista Service Pack 1

Quick Info: Windows Vista Service Pack Beta 1


Read more...

UnlockMe! Hardware Problem After Installation of Windows Vista Service Pack 1

Due to excitement about the new update, you've downloaded the stand-alone file and installed it quickly. Afterwards, your hardware is not functioning such as sound and display.

How to solve Windows Vista Service Pack 1 Installation Problems

Microsoft recommends installing SP1 through Windows Update due to some driver issues. Some devices may not work upon installation, This problem can be solve by simply uninstalling and reinstalling the driver.

That's it!

More Articles:

Installing Windows Vista Service Pack 1

Important Changes to Windows Vista Service Pack 1


Read more...

Unlock For Us

Download: Windows Vista SP1 was Released!

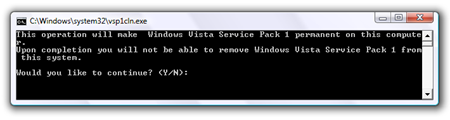
At last! After several months of waiting, Windows Vista SP1 was released!

Download Vista SP1 (Standalone Installer)
Get Vista SP1 From Windows Update


SP1 contain changes focused on reliabilities, compatibility issues, performance, supporting new types of hardware, and adding support for several emerging standards.

Important Changes to Windows Vista Service Pack 1

Quick Info: Windows Vista Service Pack Beta 1


Read more...

Unlock For Us

Download Free McAfee VirusScan Plus 2008

McAfee® VirusScan® Plus is an All in one Solution: AntiVirus, Firewall & AntiSpyware provides the essential protection you need to surf the Internet safely.

Description from uk.McAfee.com

  • Stops Viruses. Automatically blocks, cleans, and removes viruses so you can surf the Web safely and download files.
  • Blocks Spyware. Blocks spyware before it installs on your computer and removes existing spyware so you can surf the Web safely.
  • Stops Hackers. Protects and conceals your computer from hackers so you can surf the Internet safely.
  • Guards important files stored on your computer, and helps prevent your computer from crashing.
  • Automatically monitors incoming and outgoing Internet activity, looking for suspicious applications and data.
  • Improves your computer's performance by removing clutter and freeing disk space.
  • Provides advance warning to help you avoid sites which send spam, install adware, or attempt online scams.
  • Redesigned for You. Scan your computer, check for updates and configure your security settings using the new McAfee SecurityCenter. This essential, easy-to-use program gives you one-click access to your computers security information.
  • Always On, Always Protecting. 24/7 virus and threat protection from McAfee® AVERT™ Labs continuously monitors worldwide virus activities and provides immediate, anti-virus protection and removal solutions.
  • Always Upgrading, Always Updating. Daily updates are installed automatically. When a new version of McAfee is available, you get it automatically at no charge during your subscription, ensuring that you always have up-to-date protection.
  • Convenient, Ongoing Protection. McAfee offers a variety of renewal options to keep your McAfee protection current.
  • Real People, Real Help. Support from McAfee's computer security experts, via Internet chat, e-mail and phone.
  • How to Get FREE one year subscription:

    Open this website > Click on the "Free PC Security, Protect your PC for 12 months with McAfee VirusScan Plus" > Click the Register Now button and then, fill out the registration form.

    That's it!

    Thanks to Raymond for publishing the article.


    ----------------------------------------------------------

    WinBubble, Customize and Tweak your Windows Vista Easily

    *The Best FREE TweakUI Replacement - Woody Leonhard, WindowsSecrets.com
    *Uptodown.com TESTED and AWARDED
    *Freewarefiles.com Editor's Pick
    *Majorgeeks.com Editor's Pick
    *Download.hr 5-Stars award and 100% Clean Award
    *Featured at Snapfiles.com
    *5-Stars Neowin.net Choice Logo
    *WinMatrix.com Developer's Badge
    *Soft82 5 stars Award and 100% Clean Certification
    *Softpedia 100% Clean Award
    *BetaNews.com
    *CFS 5 Doves Award


    Read more...

    Windows Live Writer: File Upload Failed

    "The remote server returned an error: (500)
    Internal Server Error.
    " - WLW

    fileuploadfailed

    This is the error message I encountered when I'm writing a blog regarding the limited Free Stardock MyColors Download.

    After a few minutes of searching, luckily I found out that the problem was caused by the total number of pictures inside an Album named "Windows Live Writer" in Picasa.  Windows Live Writer creates a thumbnail for each photos that you post. Thus, instead of 250 photos only, it becomes 500.

    500 pictures is the limit in each "Windows Live Writer" Album or folder.

    How to Solve the Problem: It's Easy!

    Create a new Album called "Windows Live Writer". That's it! Picasa allows two Albums with the same name. Using this Trick you can easily solve the problem and Next time you post a blog, the new folder will be used automatically.

    Enjoy Blogging!


    More Articles:

    Eject your CD/DVD using a Keyboard Shortcut

    How to Enable/Disable Task Manager option in Windows Vista

    Advanced: How to Create/Generate a New GUID using Vb.Net, C# and Vb.Script

    How to Remove/Disable Start-up programs in Windows Vista


    Read more...

    Unlock For Us

    Try Now! Windows XP SP2 loaded with Internet Explorer 8

    A Virtual PC hard disk image containing the pre-activated version of Windows XP SP2 loaded with IE8. This is Legal!

    sp2

    Requirements:

    IE8_VPC.EXE: Download it here

    Note: This VPC image will expire on July 3, 2008.

    Tip: To download more than two files at the same time in one server (Download.Microsoft.com), including Windows Vista Business Edition, Open WinBubble > Optimization Tab > Increase the bandwidth for Network and Internet connections...That's it!

    More Articles:

    Eject your CD/DVD using a Keyboard Shortcut

    WinBubble, Customize and tweak your Windows Vista easily

    "My Tweaker Tool", Create your Own Tweaker

    UnlockMe! "Windows has blocked some startup programs"


    Read more...

    Unlock For Us

    Limited: Free Stardock MyColors Download!

    This is a limited time offer. MyColors lets you customize your Windows desktop easily. There are hundreds of MyColors themes already available.

    Mycolors2

    Updated: Latest News, MyColors 2.5 was released and there are

    Three Free Themes Available (With Pictures and Reviews)!


    Old Download Link!

    System Requirements

  • Windows XP/Vista (32 bit)
  • 256MB RAM
  • 100MB free drive space
  • Internet Connection to download, install and activate

    Related Articles:

    WinBubble, Customize and tweak your Windows Vista easily

    "My Tweaker Tool", Create your Own Tweaker

    WinGuggle, Recover your Windows Vista and Office Product Key easily

    WinFlog eXTreMe, "You're in Control", Enhances your Windows Vista Experience by Powering-up Context Menu and Customizing the Middle Mouse button


  • Read more...

    "My Tweaker Tool", Create your Own Tweaker

    Winbubble has been Customized and Updated by the users!

    Publishers will not be angry anymore because Tips and Tweaks using the registry is being eaten up by Tweaking Utilities.

    Now, Everybody can create their own Tweaks and Tricks inside. The First of a kind. There is no need to learn Programming. Winbubble will do it for you...Easily.

    Even though tweaking tools do it automatically and it bridges the Gap between the users and masters. Usually in the LONG TERM, KNOWLEDGE is Great. Adding and deleting entries to the registry is the same as one by one adding them to Winbubble. So, I recommend Try to Enjoy Hacking through Registry and When you're done, ADD THEM to Winbubble.

    [HELP] GUIDE: HOW-TO USE THIS NEW FEATURE

    1. Open Winbubble > Miscellaneous TAB, Type the Descriptions and then, Click "Create My Tweaker" Button

    1

    2. Adding entries: Gather all the Path and Values first that will be needed in creating the Tweaking tool.

    Example:

    Put IE Menu Bar on Top:
    HKEY_CURRENT_USER\Software\Microsoft\Internet Explorer
    \Toolbar\WebBrowser
    "ITBar7Position", DWORD (1 or 0)

    HIDE Notification Area/System Tray Icons:
    HKEY_CURRENT_USER\Software\Microsoft\Windows\CurrentVersion
    \Policies\Explorer
    "NoTrayItemsDisplay", DWORD (1 or Delete)

    Add Flip3D to Desktop Right-Click Menu:
    HKEY_CLASSES_ROOT\Directory\Background\shellex
    \ContextMenuHandlers\Flip3D

    (Default)="{3080F90E-D7AD-11D9-BD98-0000947B0257}"
    STRING (Set or Delete)

    Add the Registry Key, Value Name, Data and select the Data Type. And then, Choose if it will be deleted or another setting will be set after the Option is Uncheck. Finally, Click the SET BUTTON. That's it!

    Put IE Menu Bar on Top:

    Tip: Add Entries on CHECKED VALUE first before setting the option "Delete the Set Value". You will notice that It will be added Automatically.

    Settings1

    HIDE Notification Area/System Tray Icons:

    Settings2
    Add Flip3D to Desktop Right-Click Menu:

    Settings3

    Enjoy!

    Some Articles:

    Eject your CD/DVD using a Keyboard Shortcut

    How to Remove/Disable Start-up programs in Windows Vista

    UnlockMe! "Windows has blocked some startup programs"

    Windows Vista Tips, Tricks, How to, Help-guides and Unlocks


    Read more...

    Unlock For Us

    Eject your CD/DVD using a Keyboard Shortcut

    Windows Vista has an amazing built-in feature to launch programs located in Quick Launch bar using a keyboard shortcut.

    Just use Win+(Position of the icon), e.g. Win+1 To Turn off Aero using a Keyboard Shortcut. That's it! Using this feature you can now Eject CD/DVD easily. How?

    1. Download Winflog eXTreMe, Extract the ZIP file and then locate the file "ControlCD.exe".

    2. Create a shortcut and Drag it to Quick Launch bar.

    3. To launch the application, press Win + Position of the icon.

    Note: Don't forget, Shortcut keys are limited (1-9 and 0 only).

    If this doesn't work, ControlCD is not yet Activated, Open Winflog Extreme and click "Eject CD" to Add the Right-click -Menu entry.

    Enjoy!

    Some Articles:

    Windows Vista Tips, Tricks, How to, Help-guides and Unlocks

    How To Activate Flip 3d using the Middle Mouse Button / Scroll Wheel Button

    How To Turn Off Aero using the Middle Mouse Button

    How to Launch Applications using the Middle Mouse Button

    Eject your CD/DVD using the Middle mouse button


    Read more...

    Unlock For Us

    How to Enable/Disable Task Manager option in Windows Vista

    Have you ever experienced a virus that disables the Task Manager? Then after running an anti-virus, the virus has been removed but still Task Manager is disabled.

    disabled

    Using Winbubble you can re-enable this options easily. Just go to Security Tab, Uncheck the Task Manager option and then, click the Apply button. That's it!

    Related Articles:

    Unlocking WinBubble Part 3 *Securing your desktop

    Unlocking WinBubble Part 6 *More Security options

    Unlock Me! Disabling USB drives/Storage

    [Vista] Hibernate Button is gone

    Monitor attempts to access and change settings in Windows Vista


    Read more...

    Unlock For Us

    Advanced: How to Create/Generate a New GUID using Vb.Net, C# and Vb.Script

    guid

    Globally Unique Identifier or GUID is a 128-bit integer (16 bytes) that is used by some software applications across all computers and networks in order to provide a reference number which is unique or to identify a particular component. Because of this there's a very low probability that any two or more component has the same value.

    GUID is also used in Windows Registry.

    Example:

    Internet Explorer {871C5380-42A0-1069-A2EA-08002B30309D}

    Network {F02C1A0D-BE21-4350-88B0-7367FC96EF3C}

    Computer {20D04FE0-3AEA-1069-A2D8-08002B30309D}

    Web Application: GUID Generator

    guidgenerator

    Try here: http://www.windowsforus.com/guidgenerator/ 

    Vb Script

    Set TypeLib = CreateObject("Scriptlet.TypeLib")
    NewGUID = TypeLib.Guid
    WScript.Echo(left(NewGUID, len(NewGUID)-2))
    Set TypeLib = Nothing

    C#

    private void button1_Click(object sender, EventArgs e)
    {
    MessageBox.Show("GUID: {" + Guid.NewGuid().ToString()+ "}");
    }


    Visual Basic .Net 2008

    Private Sub GenerateNewGUID()
    Dim xGUID As String = System.Guid.NewGuid.ToString()
    MessageBox.Show("{" & xGUID & "}")
    End Sub


    So, What's the use of this GUID to us? Sooner or later, As you study more and more about Registry Customizations... I'm sure you'll be reading this article again.

    Sample Applications: Another Way to Add Icons to Desktop

    Enjoy!


    Read more Articles: Windows Vista Tips, Tricks and Tweaks


    Read more...

    Unlock For Us

    Internet Explorer 7: Safer Than Firefox, Opera and Safari

    The first major version of IE in over 4 years. Large portion of this program have been significantly rework. Microsoft dubbed it as the  "most secure" version of Internet Explorer to date.

    CENZIC APPLICATION SECURITY TRENDS REPORT – Q4, 2007, Internet Explorer has the smallest vulnerabilities by a 22% margin compared to Firefox. Surprised?

    IE SAFER

    Opera had the most reported vulnerabilities, 38% and surprisingly Firefox was next by a 6 percent margin.

    "Vulnerabilities in Web browsers were concentrated among four popular technologies - Internet Explorer, Mozilla Firefox, Opera, and Safari. Showing a similar trend as Q3 2007, the Opera Web browser with 38 percent had the most reported vulnerabilities during the Q4 time period, with Firefox coming in second by a 6 percent margin. The chart below shows the percentage of the total browser vulnerabilities associated with each product. Unlike previous quarters, less vulnerabilities were reported in Internet Explorer than in Opera, Firefox, or Safari." - Source: Cenzic Application Security Trends Report – Q4, 2007, Cenzic Inc.

    To download the complete documentation, click here

    Microsoft is trying to fix and innovate Internet Explorer one by one, that's a good thing. It will benefit the Internet users as long as there's a competition.

    Some users said they will wait for the upgraded version of Firefox, cool!!!

    Thanks to Softpedia for publishing the article...

    Featured Articles:

    Internet Explorer 7 Top Ten features

    Windows Vista Tips, Tricks, Hacks, How-To, Guides, News and Tweaks

    Windows Xp, Web, Soft Review and Hacks

    UnlockMe! "Windows has blocked some startup programs"

    How to Remove/Disable Start-up programs in Windows Vista


    Read more...

    Unlock For Us

    UnlockMe! "Windows has blocked some startup programs"

    "After I installed a program, I got this message..."

    message

    When you start your Windows Vista computer, a warning message appears and says that some startup programs has been blocked.

    This problem occurs when a startup program that has User Account Control (UAC) restrictions tries to launch during startup or logon process. 

    "User Account Control is a set of infrastructure technologies that helps prevent malicious programs, sometimes called "malware," from damaging your computer - Microsoft"

    Solutions:

    A. I know this program: Run the blocked program when Windows Vista Starts.

     runblock

    1. Click the Blocked startup programs icon
    2. Choose Run blocked program > click the program in the list that you want to unblock.

    B. I don't know this program: Remove the program when Windows Vista Starts.

    1. Click the Blocked startup programs icon
    2. Choose Show or remove blocked startup programs and follow the steps indicated in the previous article: How to Remove/Disable Start-up programs in Windows Vista

    That's it!

    Enjoy!!!

    Featured Articles:

    Add "Hide/Show My Computer" in Network Icon Context Menu

    Windows Vista Tips, Tricks, Hacks, How-To, Guides, News and Tweaks

    Windows Xp, Web, Soft Review and Hacks


    Read more...

    Unlock For Us

    How to Remove/Disable Start-up programs in Windows Vista

    The longer you use your computer and installing numerous applications, the slower it boots up. This is because bloatwares uses large amounts of system resources during Windows start-up.

    Solution: Disable or Uninstall them! There are several ways to disable programs when Windows Vista Starts. However, Most of them are redundant.

    Disable Start-Up Programs using the Software Explorer in Windows Defender

    1. In the Control Panel, open Windows Defender, Select Tools, and then click Software Explorer.
    2. Select Startup Programs from Category.
    3. To remove a program from startup, select the program and click the Remove button. Use the Disable button to temporarily stop the program from starting when Windows starts. To make them active again, simply select the program and click the Enable button.

    software explorer

    4. As easy as it sounds though, However, you cannot disable some programs using software explorer because the "Remove, Disable and Enable Buttons" are grayed out. So, Use the next tutorial.

    Disable Start-Up Programs using MSCONFIG.EXE (System Configuration)

    1. Press Win+R > type "msconfig"

    2. Go to Startup Tab > Uncheck the program, and then click the Apply button.

    msconfig

    3. You need to Restart your computer to apply the changes.

    4. After Reboot, You'll get a message "Windows has blocked some startup programs". To Stop the annoying message, Click the icon in the notification area/system tray, select "Run blocked program" and then "System Configuration Utility".

    system configuration

    5. Check the checkbox: "Don't show this message or annoy me again when Windows starts"

    That's It!

    Featured Articles:

    "Access denied", opening a folder in Windows Vista

    Important Changes to Windows Vista Service Pack 1

    How to Restore DVD Drive Label / Names in Windows Vista

    [Vista] Hibernate Button is gone

    Windows Vista Tips, Tricks, Hacks, How-To, Guides, News and Tweaks


    Read more...

    Unlock For Us

    Add "Hide/Show My Computer" in Network Icon Context Menu

    Hide and show your computer inside the network in just two clicks.

    hideme

    Now, you will learn how to do it manually and automatic by using Winbubble.

    Ever wonder why and how these entries are being made? Read this first: Customizing Context Menu

    Next, Read this: UnlockMe! Hide your computer in the Network

    How to add these entries?

    1. From Command Elevation Template, use: net config server /hidden:
    2. The seventh line should be like this:

    objApp.shellExecute "cmd.exe", " /c net config server /hidden:" & chr(34) & strArg & chr(34), , "runas", 1

    If don't want to commit a mistake, just Download the Vb Script file. Right-Click > Save Link/Target As

    3. Open WinBubbles > Miscellaneous Tab > Click the Windows Explorer (All Files) Button > Type any name e.g. Hide My Computer > Click the Browse Button > type *.vbs or simply *.*, locate and Click the VB Script File to set the Path.

    Name: Hide My Computer

    Command: wscript "Path" yes

    Example: wscript "C:\Downloaded\WinBubble 1.76\Tools\hidecomp.vbs" yes

    Finally, Edit the Command Field by adding wscript, qoutes in the path and yes > Click the Add Button. That's it!

    4. To Add the "Show My Computer" Context Menu, Please repeat the #3 procedure and use the settings below:

    Name: Show My Computer

    Command: wscript "Path" no

    Example: wscript "C:\Downloaded\WinBubble 1.76\Tools\hidecomp.vbs" no

    Finally, Edit the Command Field by adding Space plus "no" > Click the Add Button. Enjoy!

    For Windows XP, .Net Framework is Needed.

    Download WinBubbles

    1. Open "Notepad.exe" and paste this:

    Net config server /hidden:yes

    2. Save the file as "Hide.bat"

    3. Repeat the steps in #1 and use this:

    Net config server /hidden:no

    4. Save the file as "Show.bat"

    5. Open WinBubble > miscellaneous tab > Click the "Network" button > type "Hide My Computer" or any in the name > Click the browse button and locate "Hide.Bat"

    Note: If you want to backup first, click the Backup button...

    Name: Hide My Computer
    command: [path of Hide.bat]

    Click the Add button...

    6. To Add "Show my Computer", repeat the steps in #5 and use the the file "Show.Bat".

    Name: Show My Computer
    command: [path of Show.bat]

    Lastly, Click the Add button... That's it!!!

    Enjoy!!!

    For more Tips and Tricks:

    Windows Vista Tips, Tricks, Hacks, How-To, Guides, News and Tweaks

    Windows Xp, Web, Soft Review and Hacks

    How To Activate Flip 3d using the Middle Mouse Button / Scroll Wheel Button

    How To Turn Off Aero using the Middle Mouse Button

    How to Launch Applications using the Middle Mouse Button

    Eject your CD/DVD using the Middle mouse button

    Add "Hide This File" and "Hide This Folder" to your Right-Click / Context Menu in Windows Vista and XP


    Read more...


    © Naga Heavy Industries (NHI) @2024| Blogger| License Agreement